Invoicing
This page will equip you with the necessary knowledge and skills to manage the invoicing process.
This page provides instructions for managing invoices. It's crucial to adhere to company guidelines, regional regulations, and customer requirements to ensure compliance and accuracy in the invoicing process. Whether you're utilizing standard tabs or workbench tiles to navigate, these steps will streamline your invoicing experience.
If you are using a Standard Account, you can also visit this page or watch this video playlist for dedicated instructions.
This training article will cover various types of invoices, including:
- Standard Invoice
- against Purchase Order (PO-invoice)
- against Service Entry Sheet
- against Blanket Purchase order
- against Goods Receipt
- Invoice with no Purchase order (Non-PO invoice)
- Contract Invoice
- CSV invoice
- Credit memo
- Summary invoice
- Debit Memo
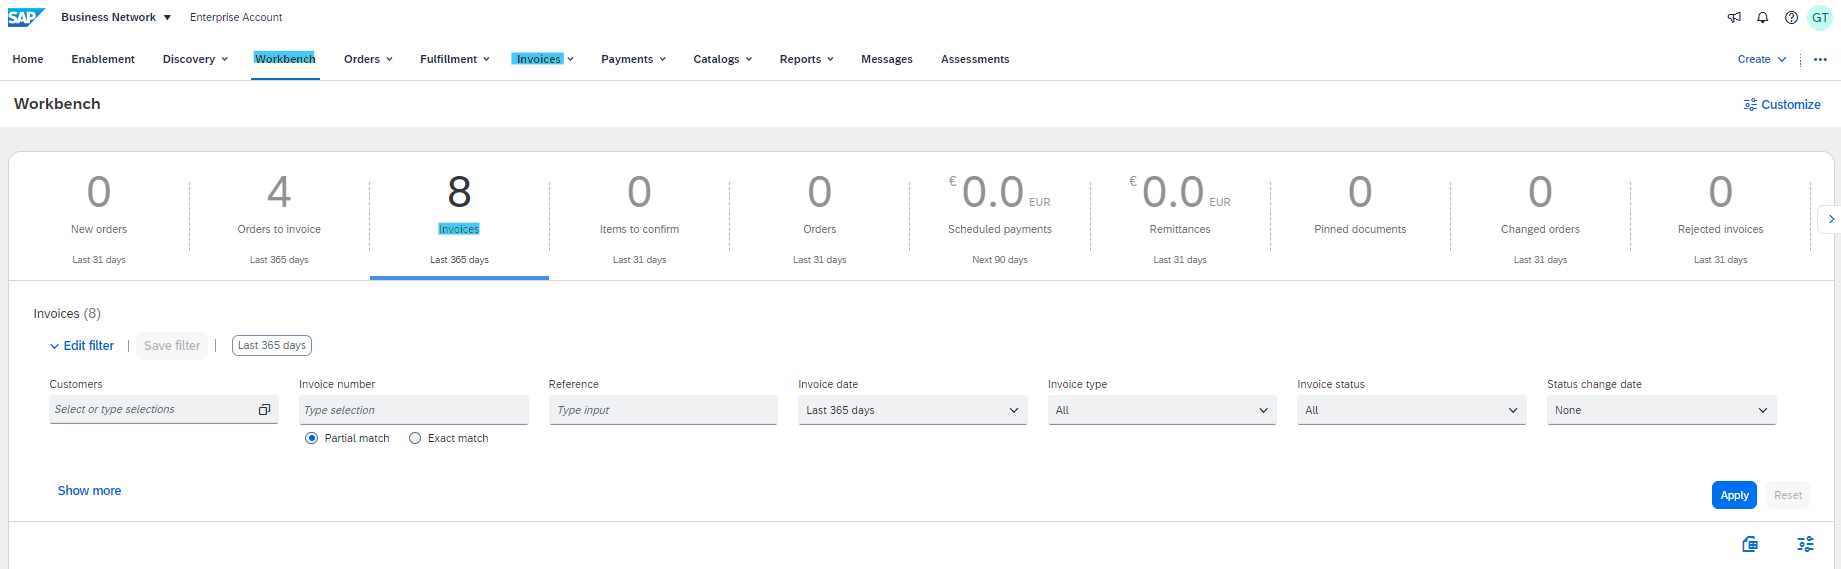
You can either invoice using the regular tabs or also the tiles on Workbench.
Invoice Creation Process Overview:
Understanding that transaction rules dictate required fields and processes can enhance your overall invoicing experience. Depending on the invoice type, fields may vary in necessity and visibility, whether at the header or line item level. Upon completing entries, you can proceed to review and submit your invoice or return it to previous stages as needed.
Specific Invoice Types:
For each specific invoice type, the process may vary slightly. Here's how to handle different invoice scenarios:
Standard Invoice against a Purchase Order
General Invoice creation process
- Locate and open the PO you want to invoice.
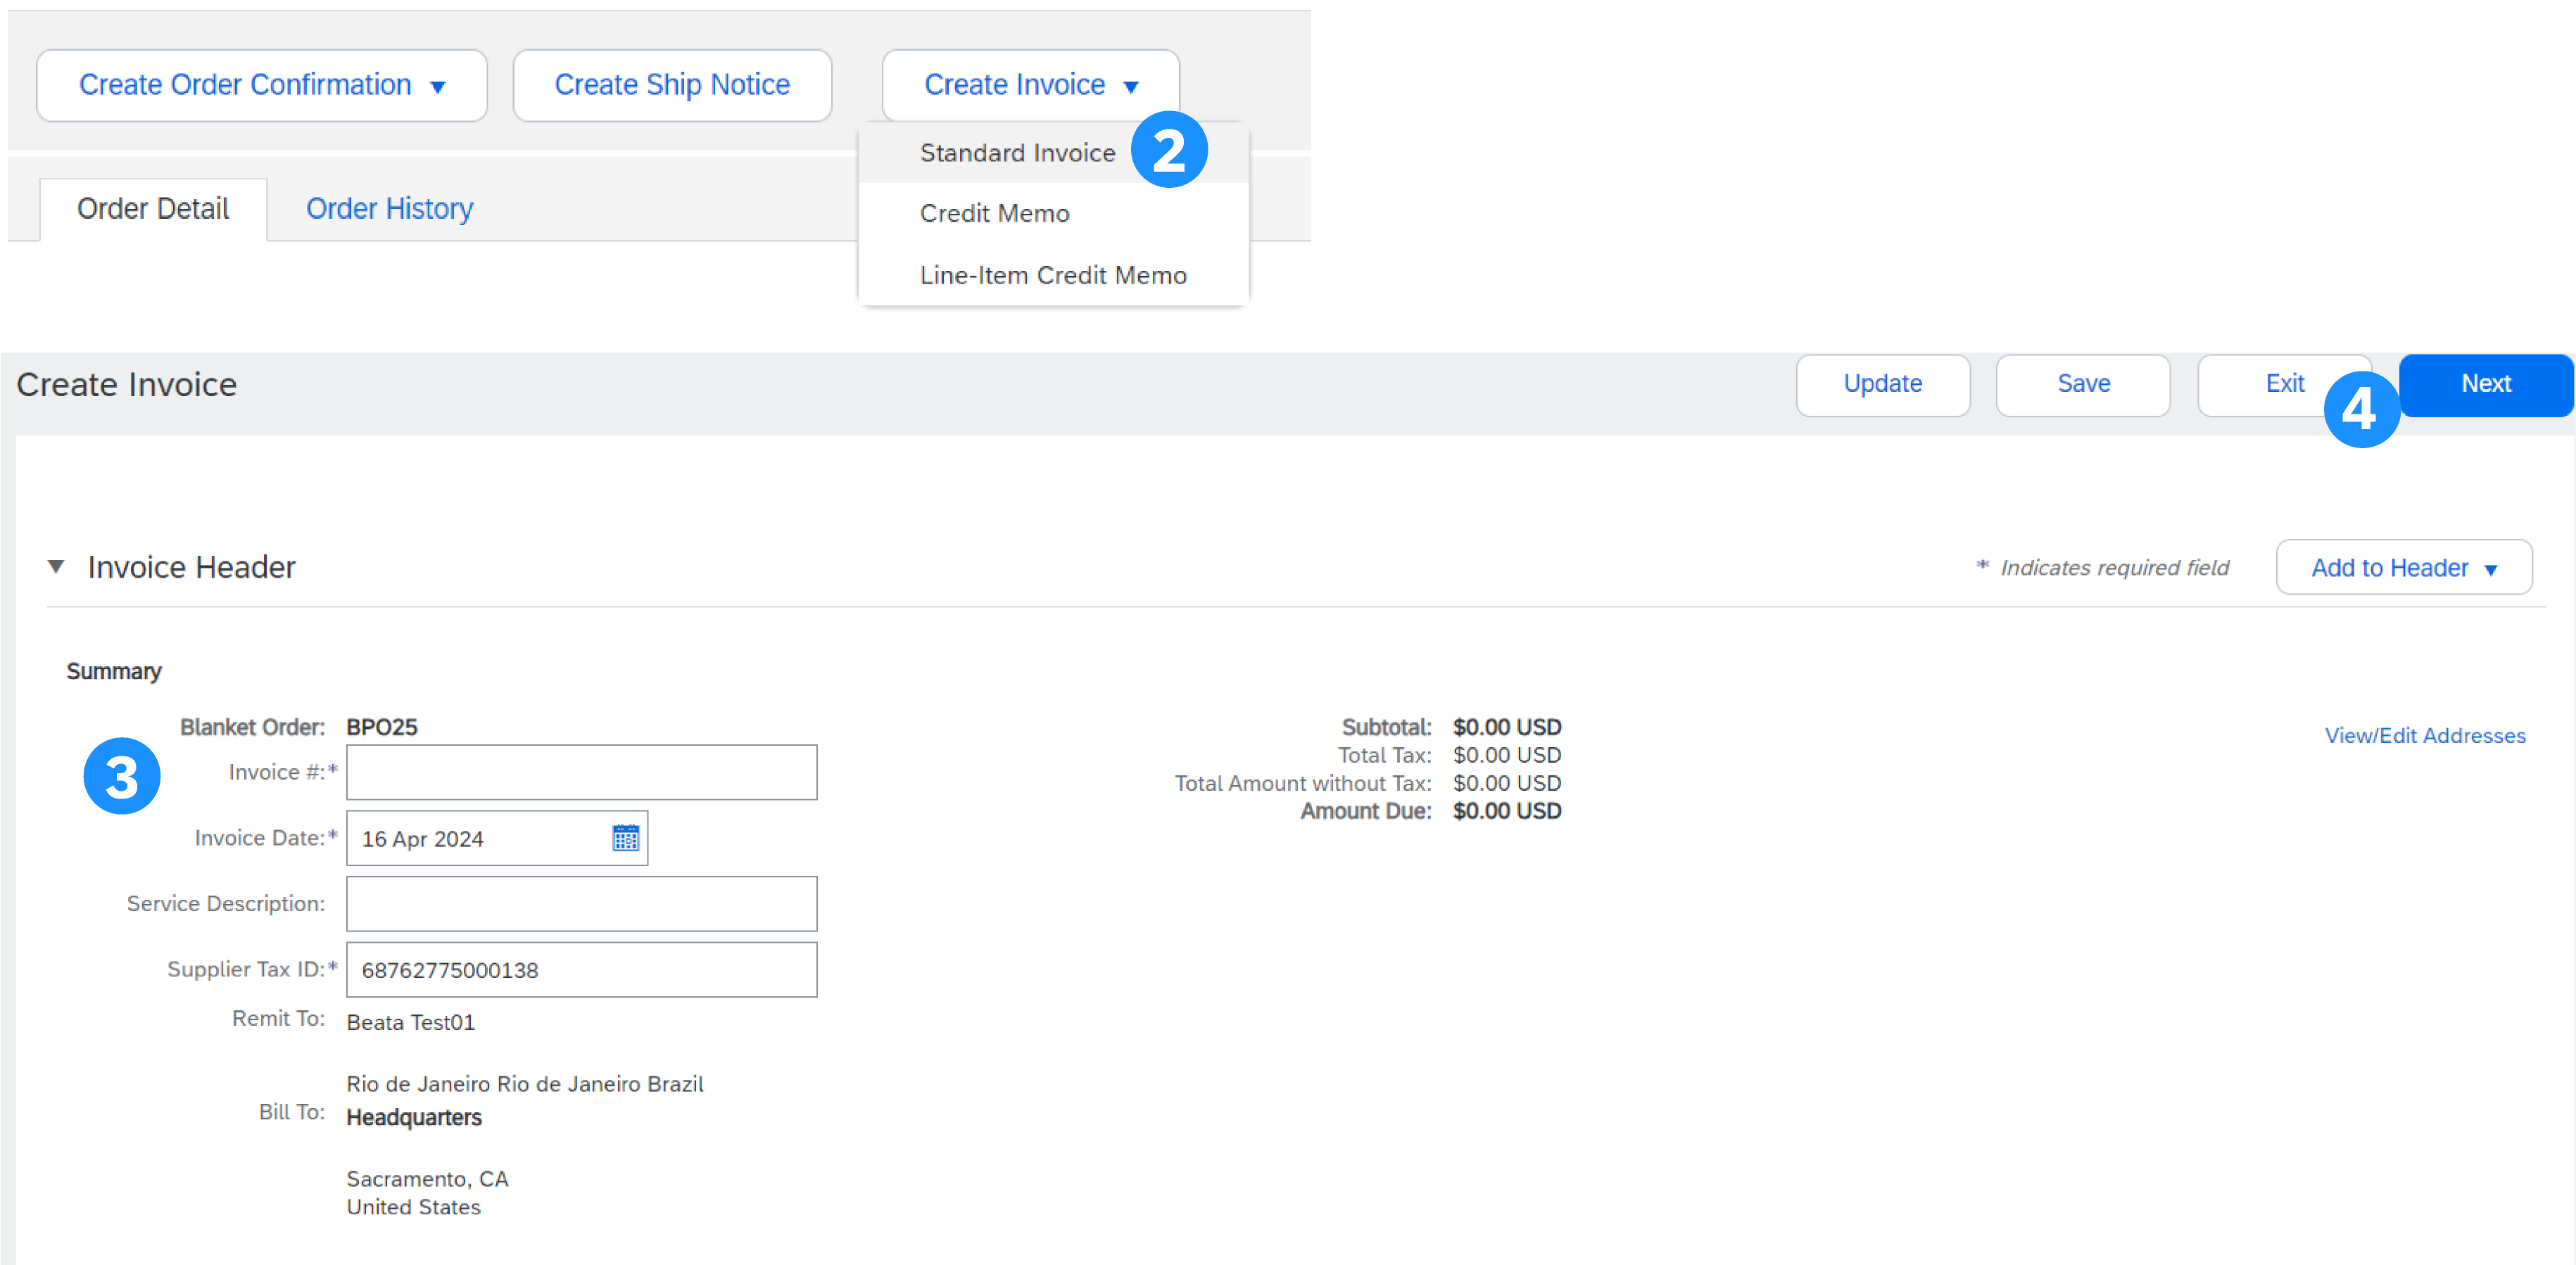
- Click Create Invoice > Standard Invoice.
- The invoice is automatically pre-populated with the PO data. Complete all fields marked with an asterisk and add tax as applicable.
- Once you’ve completed all required fields and optional fields if necessary, click Next.
- On the Review page, review your invoice for accuracy. Once satisfied, click Submit to send the invoice to your customer.
Note: the type and amount of fields to fill in depends on transacting rules set up by your customer and regional legal rules. Check the Regional Variations section of this training site for more information.
Header Information
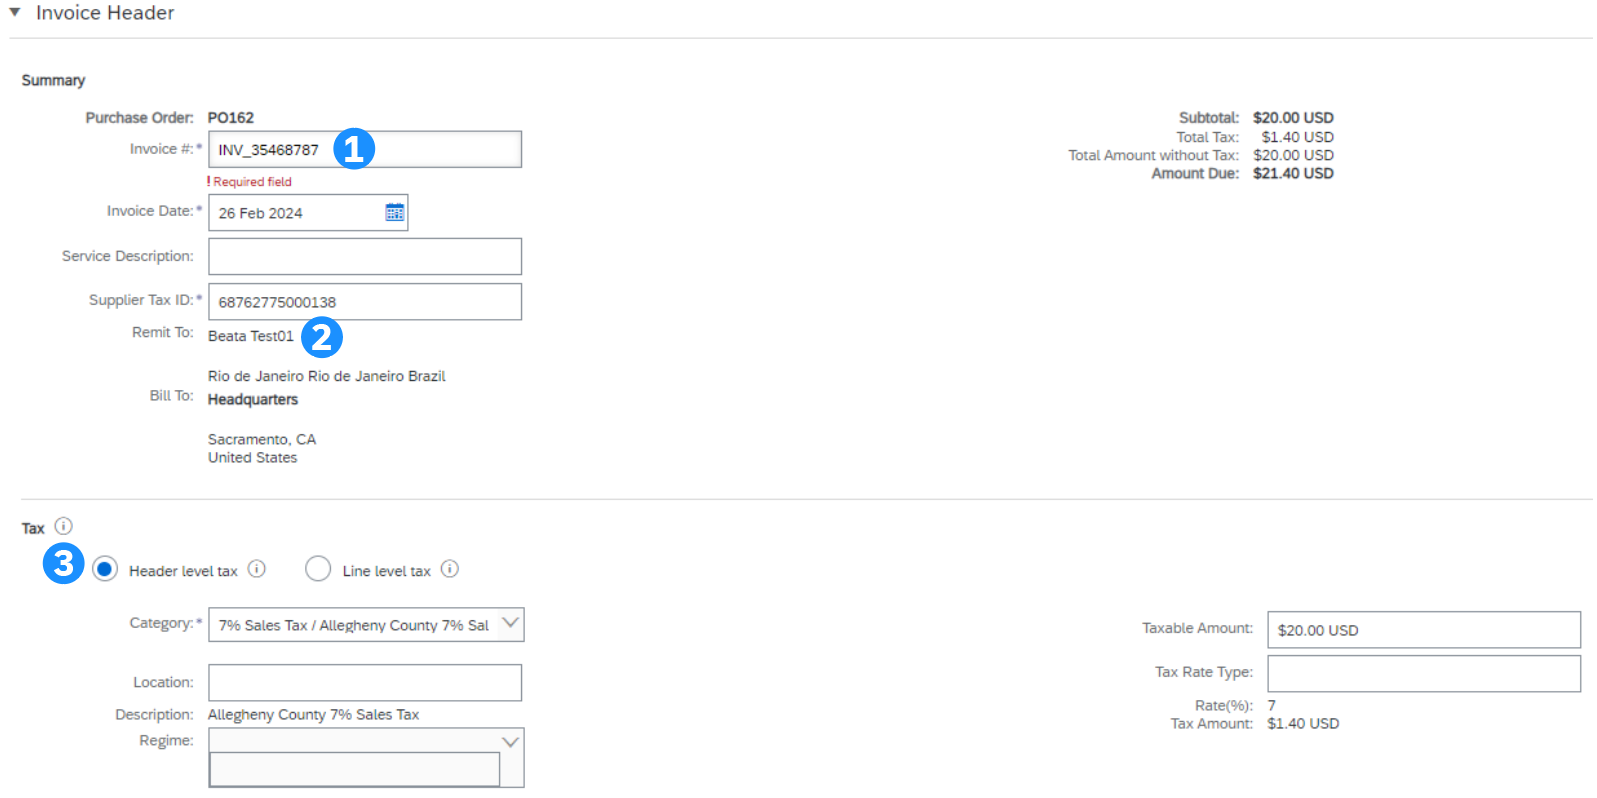
- Enter an Invoice # which is your unique number for invoice identification. The Invoice Date will auto-populate and can be adapted if allowed by the customer as it depends on transaction rules, whether it is possible or not. Usually, suppliers cannot backdate
- Choose the correct Remit-to address (if several addresses were configured during setup).
- Tax and Shipping can be entered at either the Header or Line level by selecting the appropriate radio button. This also depends on your country, please check the Regional Variations tile for more information
- Click Add to Header to add additional information to the invoice, including Comments, Attachments (max. 10 MB), and Payment Terms...
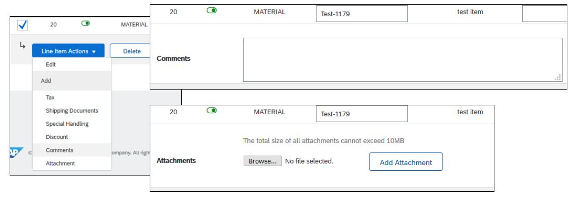
Additional Header Information
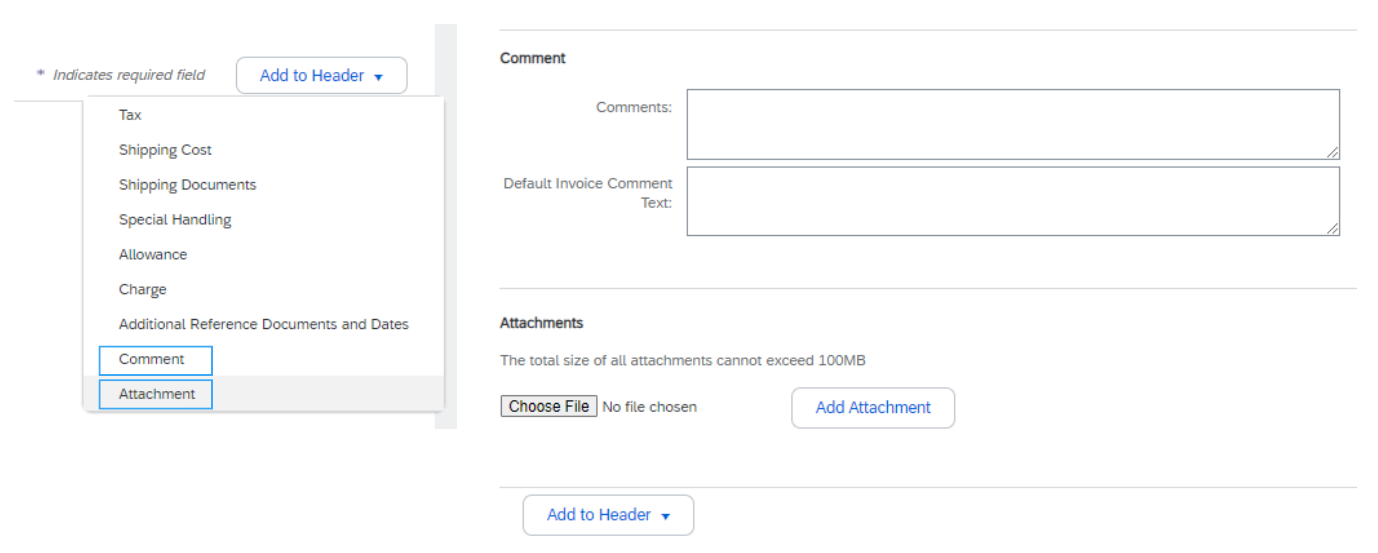
To enter additional information to the header, like comments or attachments, click the Add to Header button at the top and bottom of the header.
- To add a comment, click Comment. The Comment field appears, allowing you to add free text.
- To enclose a document, click Attachment. Then browse your computer and click on Add Attachment. The total size of all attachments cannot exceed 10MB.
Note: the available options might differ depending on your customer's transacting rules in place.
Line Items Information
- Review or update Quantity / Pricing for each line. Some fields might be greyed out due to your customer's transacting rules.
- To exclude a line from the invoice, click the line item’s green slider, OR delete the line by selecting the line item and clicking Delete. You can generate another invoice to bill for that item later.
- If you need to add Taxes, you can either:
- Select line item(s), click Line Item Actions, then Tax. The tax subline will appear below each selected line.
- OR use the Tax Category dropdown at the top to select from the displayed options, then click Add to Included Lines to apply the selected Tax rate to all lines with the green slider activated.
Tip: Use the Configure Tax Menu option to set up a quick list of tax rates you regularly apply.
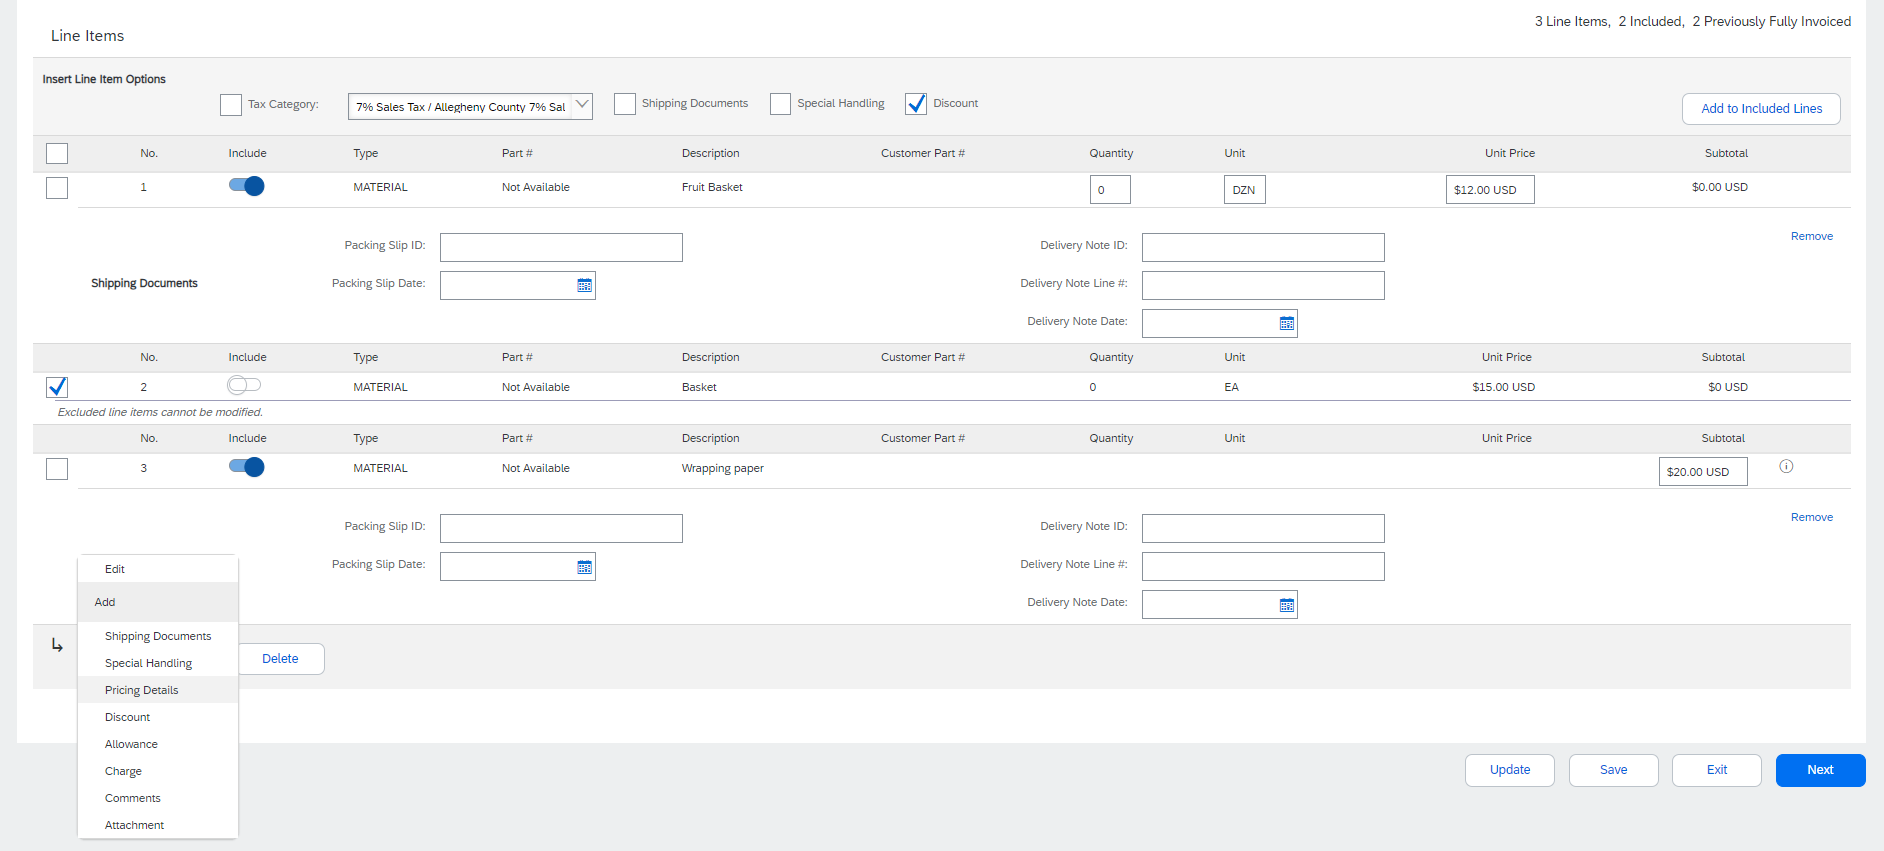
Additional Line Item Level Information
Additional information can be added or edited at the Line Item Level.
- To view/edit elements of a particular line item, select the relevant line, then click Line Item Actions> Edit. When complete, click Done to return to Invoice.
- To add comments at the individual line item level, select the relevant line, then click Line Item Actions > Comments
- To add attachments at the individual line item level, select the relevant line, then click Line Item Actions > Attachment
Allowances and Charges
If Allowances and Charges are included in the PO, these will convert to the Invoice at either Invoice Header (1) or Line Item Level (2) based on where the information is on the PO.
Review & Submit
- Once you are done editing, click on Next. If there are any errors, there will be a notification in red where information must be corrected. You must resolve the errors before you can proceed.
- On the Review page, review your invoice for accuracy. Scroll down the page to view all line item details and invoice totals.
- If no changes are needed, click Submit to send the invoice to your customer.
- If changes are needed, click Previous to return to previous screens.
Alternatively, you can save your invoice at any time during invoice creation to work on it later. You may resume working on a saved invoice by selecting it from Invoices > Drafts.
The Update button refreshes the page and allows you to check for errors.
Standard Invoice against a Service Entry Sheet
When invoicing a service, you can edit lines (or sublines of a service line) based on what defaults from the PO, or decide to add a service line to the invoice. If a service entry sheet (SES) had previously been created (and approved), you can start the invoicing process from the SES. Some customers have invoice auto-generation from SES activated and receive a specific pop-up message indicating SES will be auto-generated when attempting to invoice.
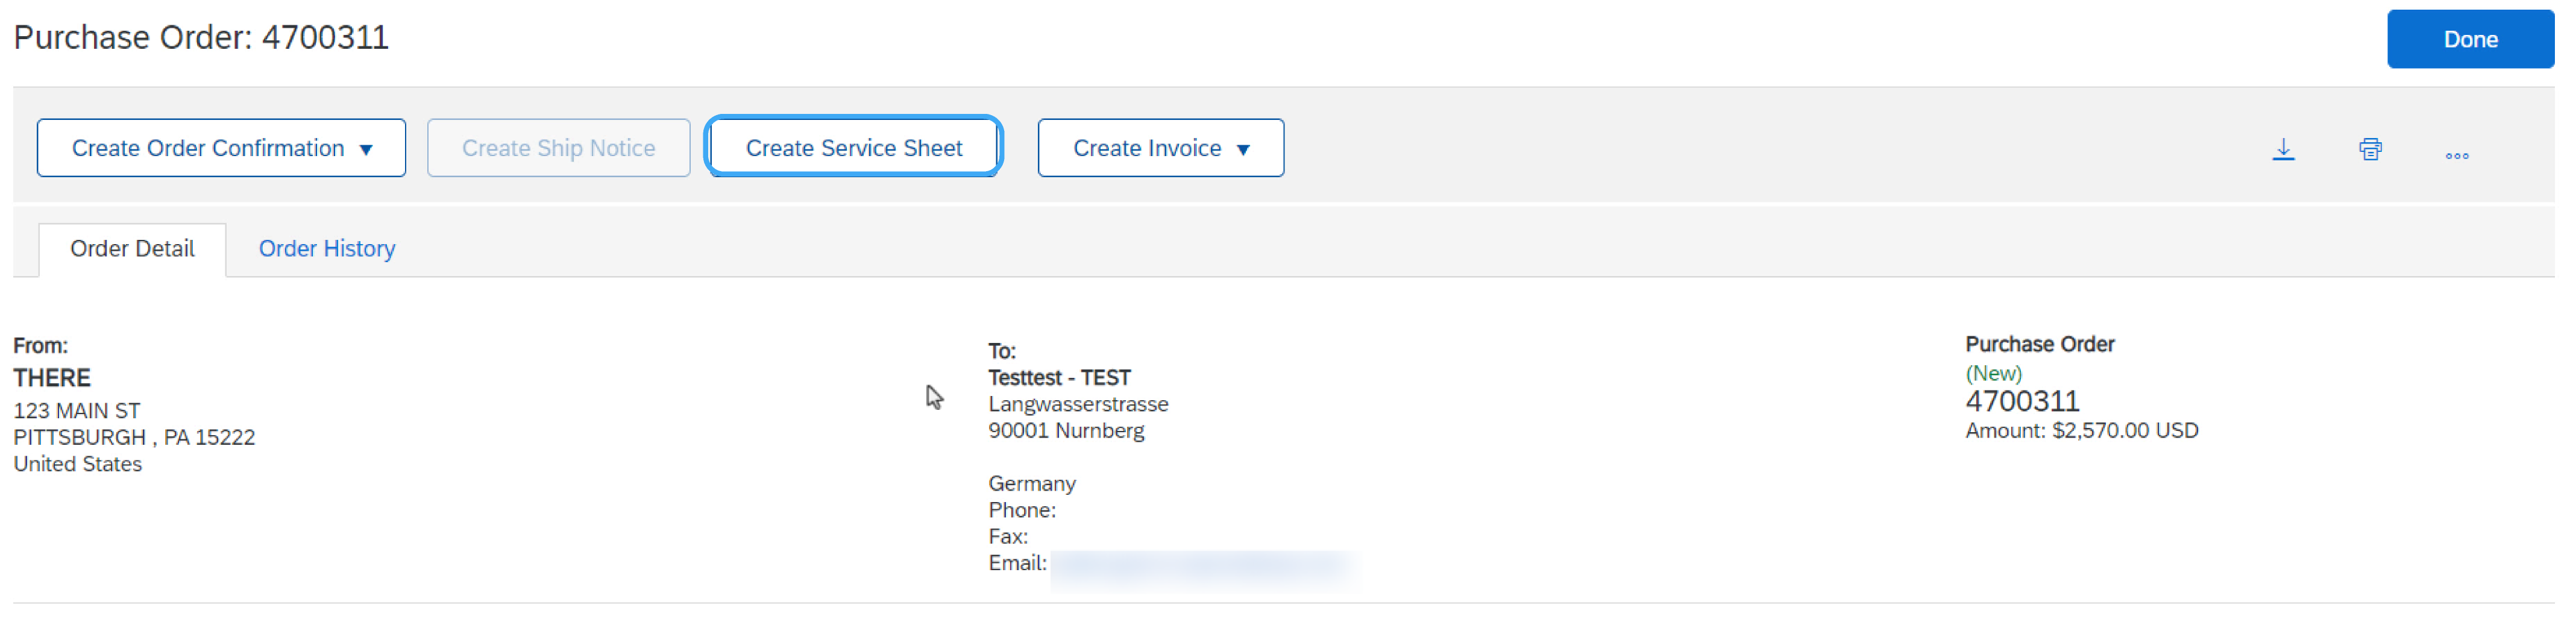
Invoice from a Service Sheet – Locate Approved Service Sheet
- Click the Fulfillment tab and select Service Sheets.
- Select the checkbox next to the approved service sheet and click Create Invoice or click the service sheet number to open the service sheet for review before invoicing.
- Enter your invoice number and complete all fields marked required with an asterisk (*). The invoice date will automatically populate.
Note: You will only be able to create an invoice against an approved service sheet. Invoice information will automatically pre-populate from the service sheet.
Invoice from a Service Sheet – Header Level Details
- Header level information can be entered after the screen refreshes. Complete each section as needed before proceeding to the Line Items section.
- The Additional Fields section includes optional fields such as reference numbers, service period dates, and Approver Email.
Note: Your customer might require some fields at the header level. Check for fields marked with an asterisk (*), and enter information as required.
Add to Header allows for shipping cost, shipping documents, amount details, special handling, and additional reference documents and dates. Comments and attachments may also be added at the header level.
Invoice from a Service Sheet – Line Item Details
Invoice information will automatically pre-populate from the service sheet.
- Add line-level information, including comments and attachments, by selecting the line and clicking the Line Item Actions. The screen will automatically refresh and you will be able to fill in the detail.
- Update each line item as needed until all items are complete.
- Click Next to proceed to the Review screen.
- From the Review screen, check your Invoice for accuracy. If there are errors, click Previous to return and make corrections. To submit to your customer, click Submit.
Add Service Lines to Invoices
To access this functionality, your customer must enable it.
- Select the Add dropdown menu and select Add General Service or Add Labor Service.
- Enter details for General or Labor Services. General Service lines ask for limited details, including service start and end dates. Labor Service contains additional fields including rate, term, and contractor information.
Invoice a Service Order with Hierarchy
To access this functionality, your customer must enable it.
For planned lines in service purchase orders with hierarchy, you can edit only the quantity for child line-items, and include taxes, allowance, and charges. SAP Business Network validates the quantity against the quantity limit specified in the purchase order considering the quantity tolerance set by the buyer.
Once done, click on Next, then on Submit.
Standard Invoice against a Blanket Purchase Order
General Process
To Create an Invoice from a Blanket Purchase Order (BPO):
- Locate and open the BPO (under the Orders tab or using the workbench).
- Click Create Invoice and select Standard Invoice.
- Complete Header section information as needed, including all information marked required with an asterisk (*).
- Check the box of the line item you plan on invoicing against.
- Click Create at the bottom and select the appropriate option; Goods or Services.
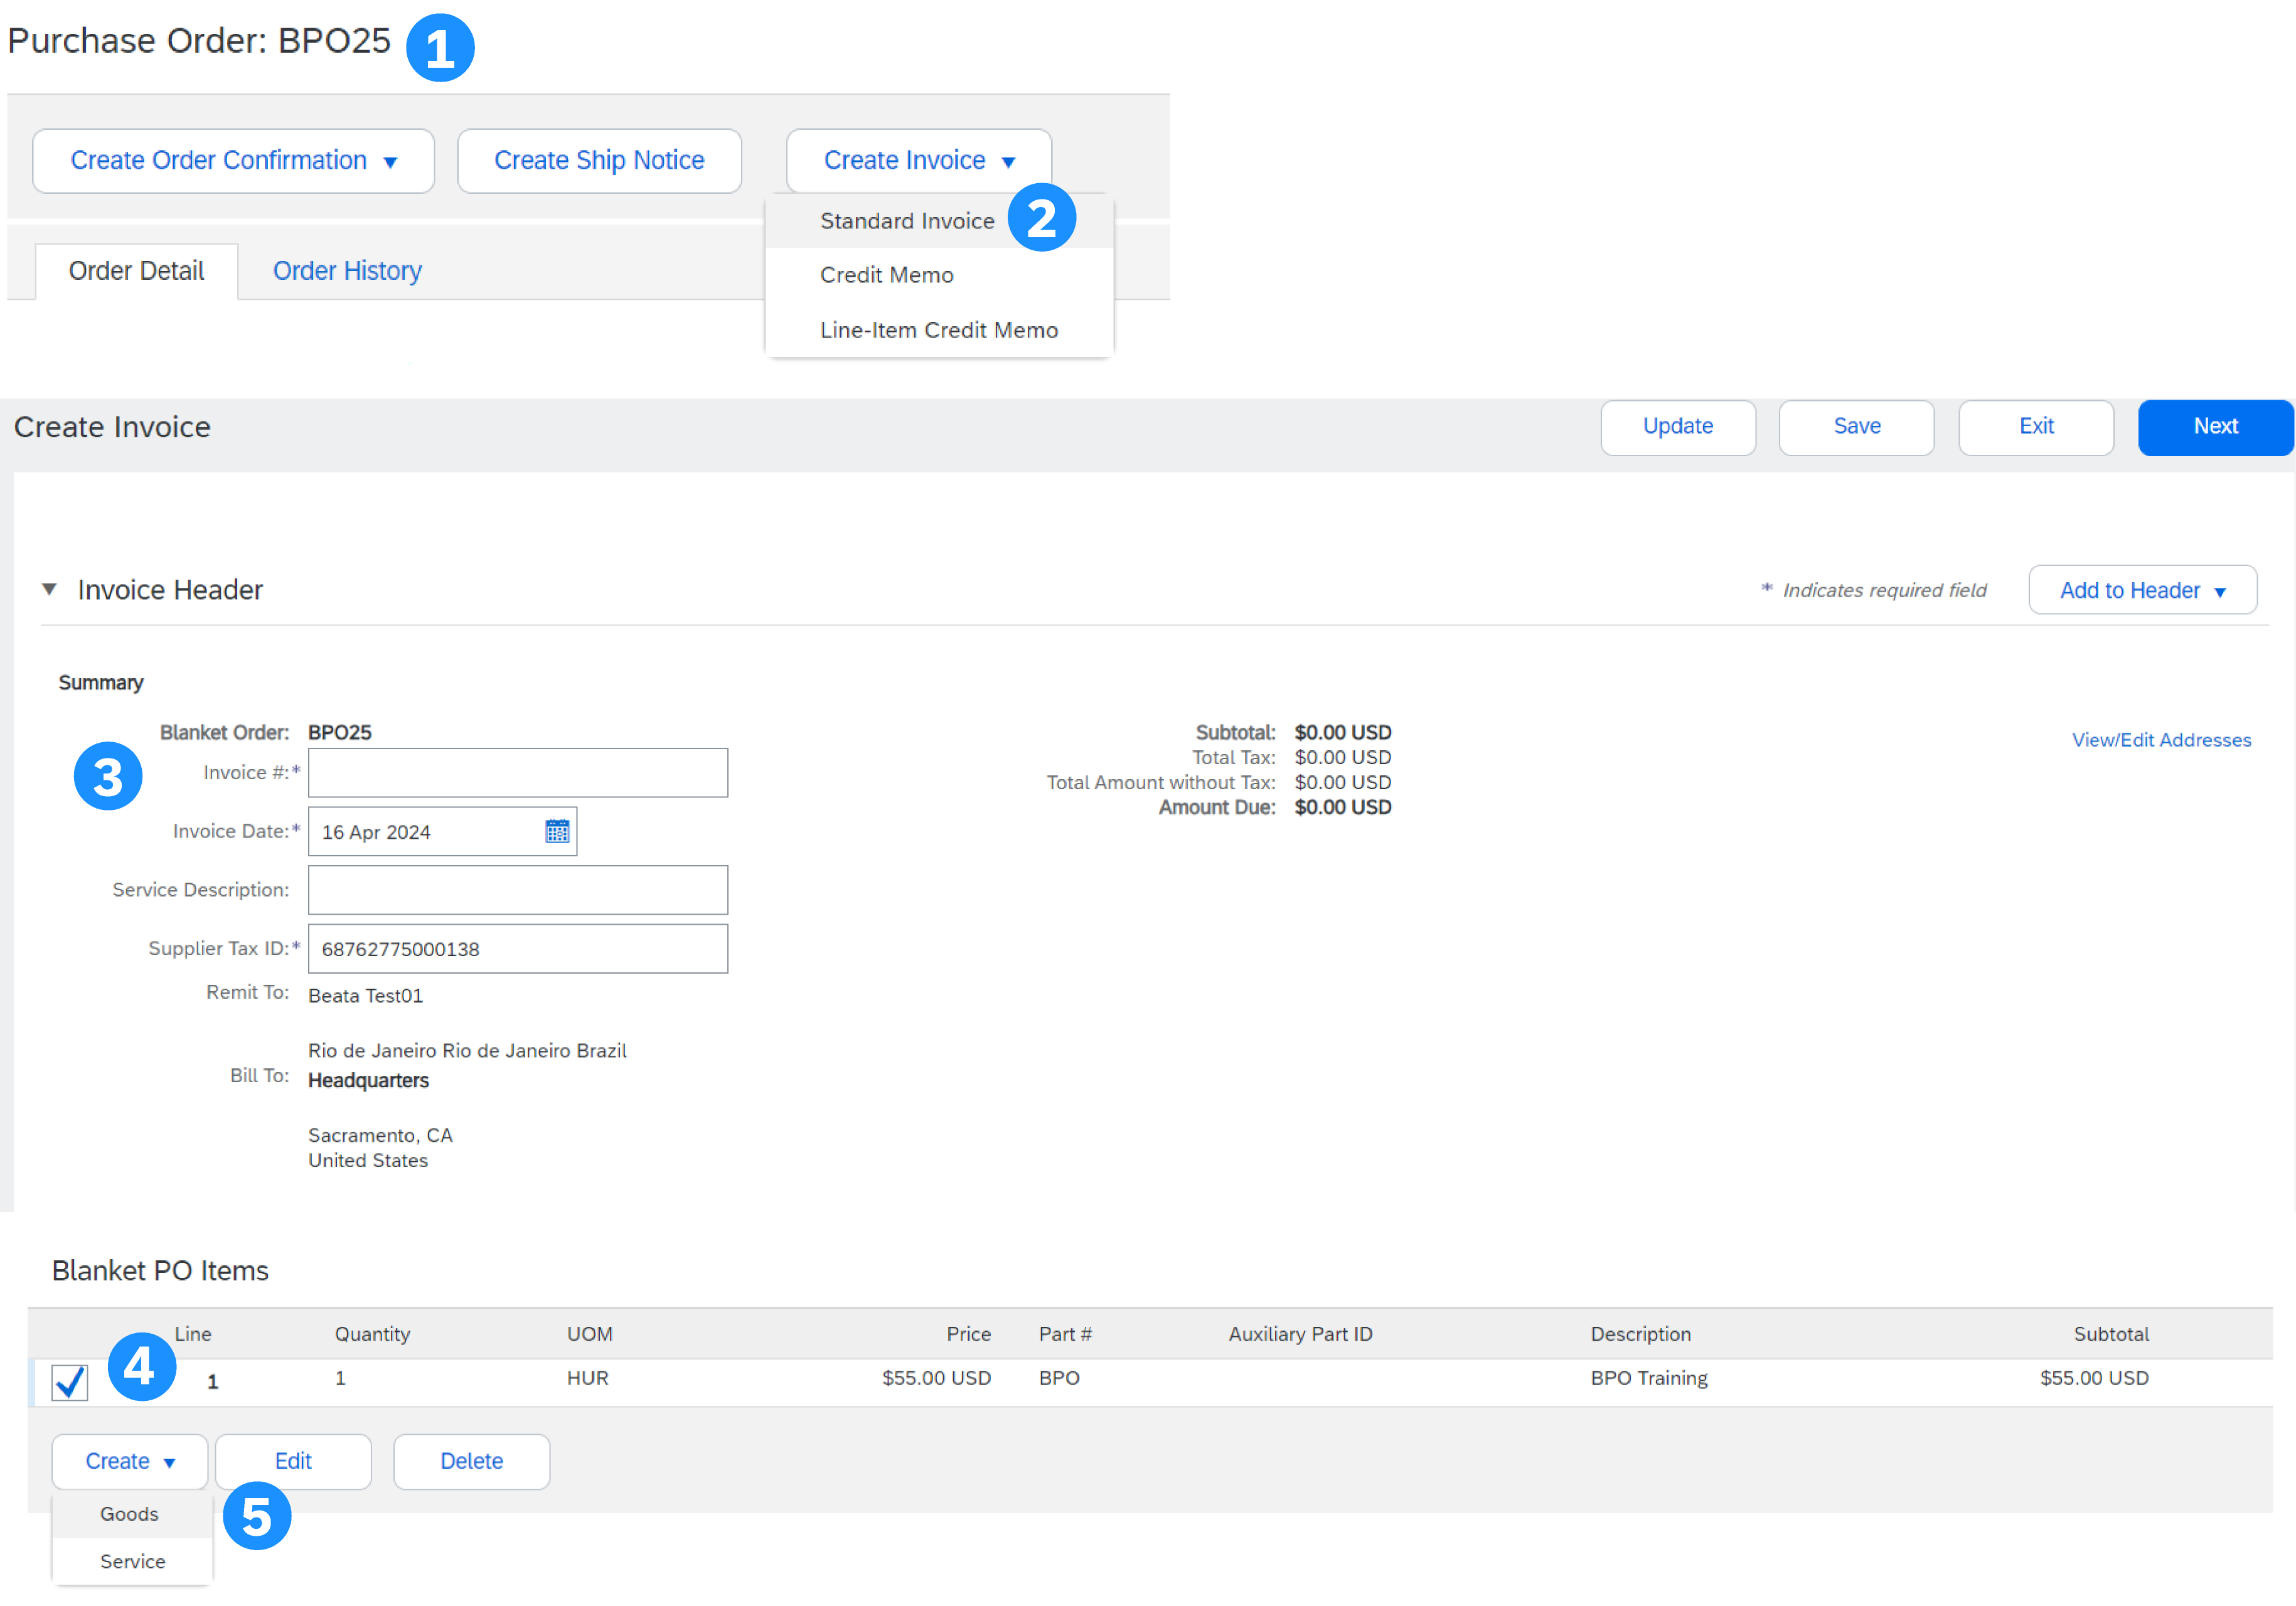
BPO Line Level Information
- Update required fields including the Quantity and/or Price fields to create the invoice line item.
- Click Create when done.
- Once completed, your invoice line will appear as a sub-line (i.e. 10.1) showing the quantity being invoiced.
- Repeat the process as needed for each line.
- Click Next to continue.
- Review, Save, or Submit as a Standard Invoice.
Contract Invoice
Create an Invoice Against a Contract
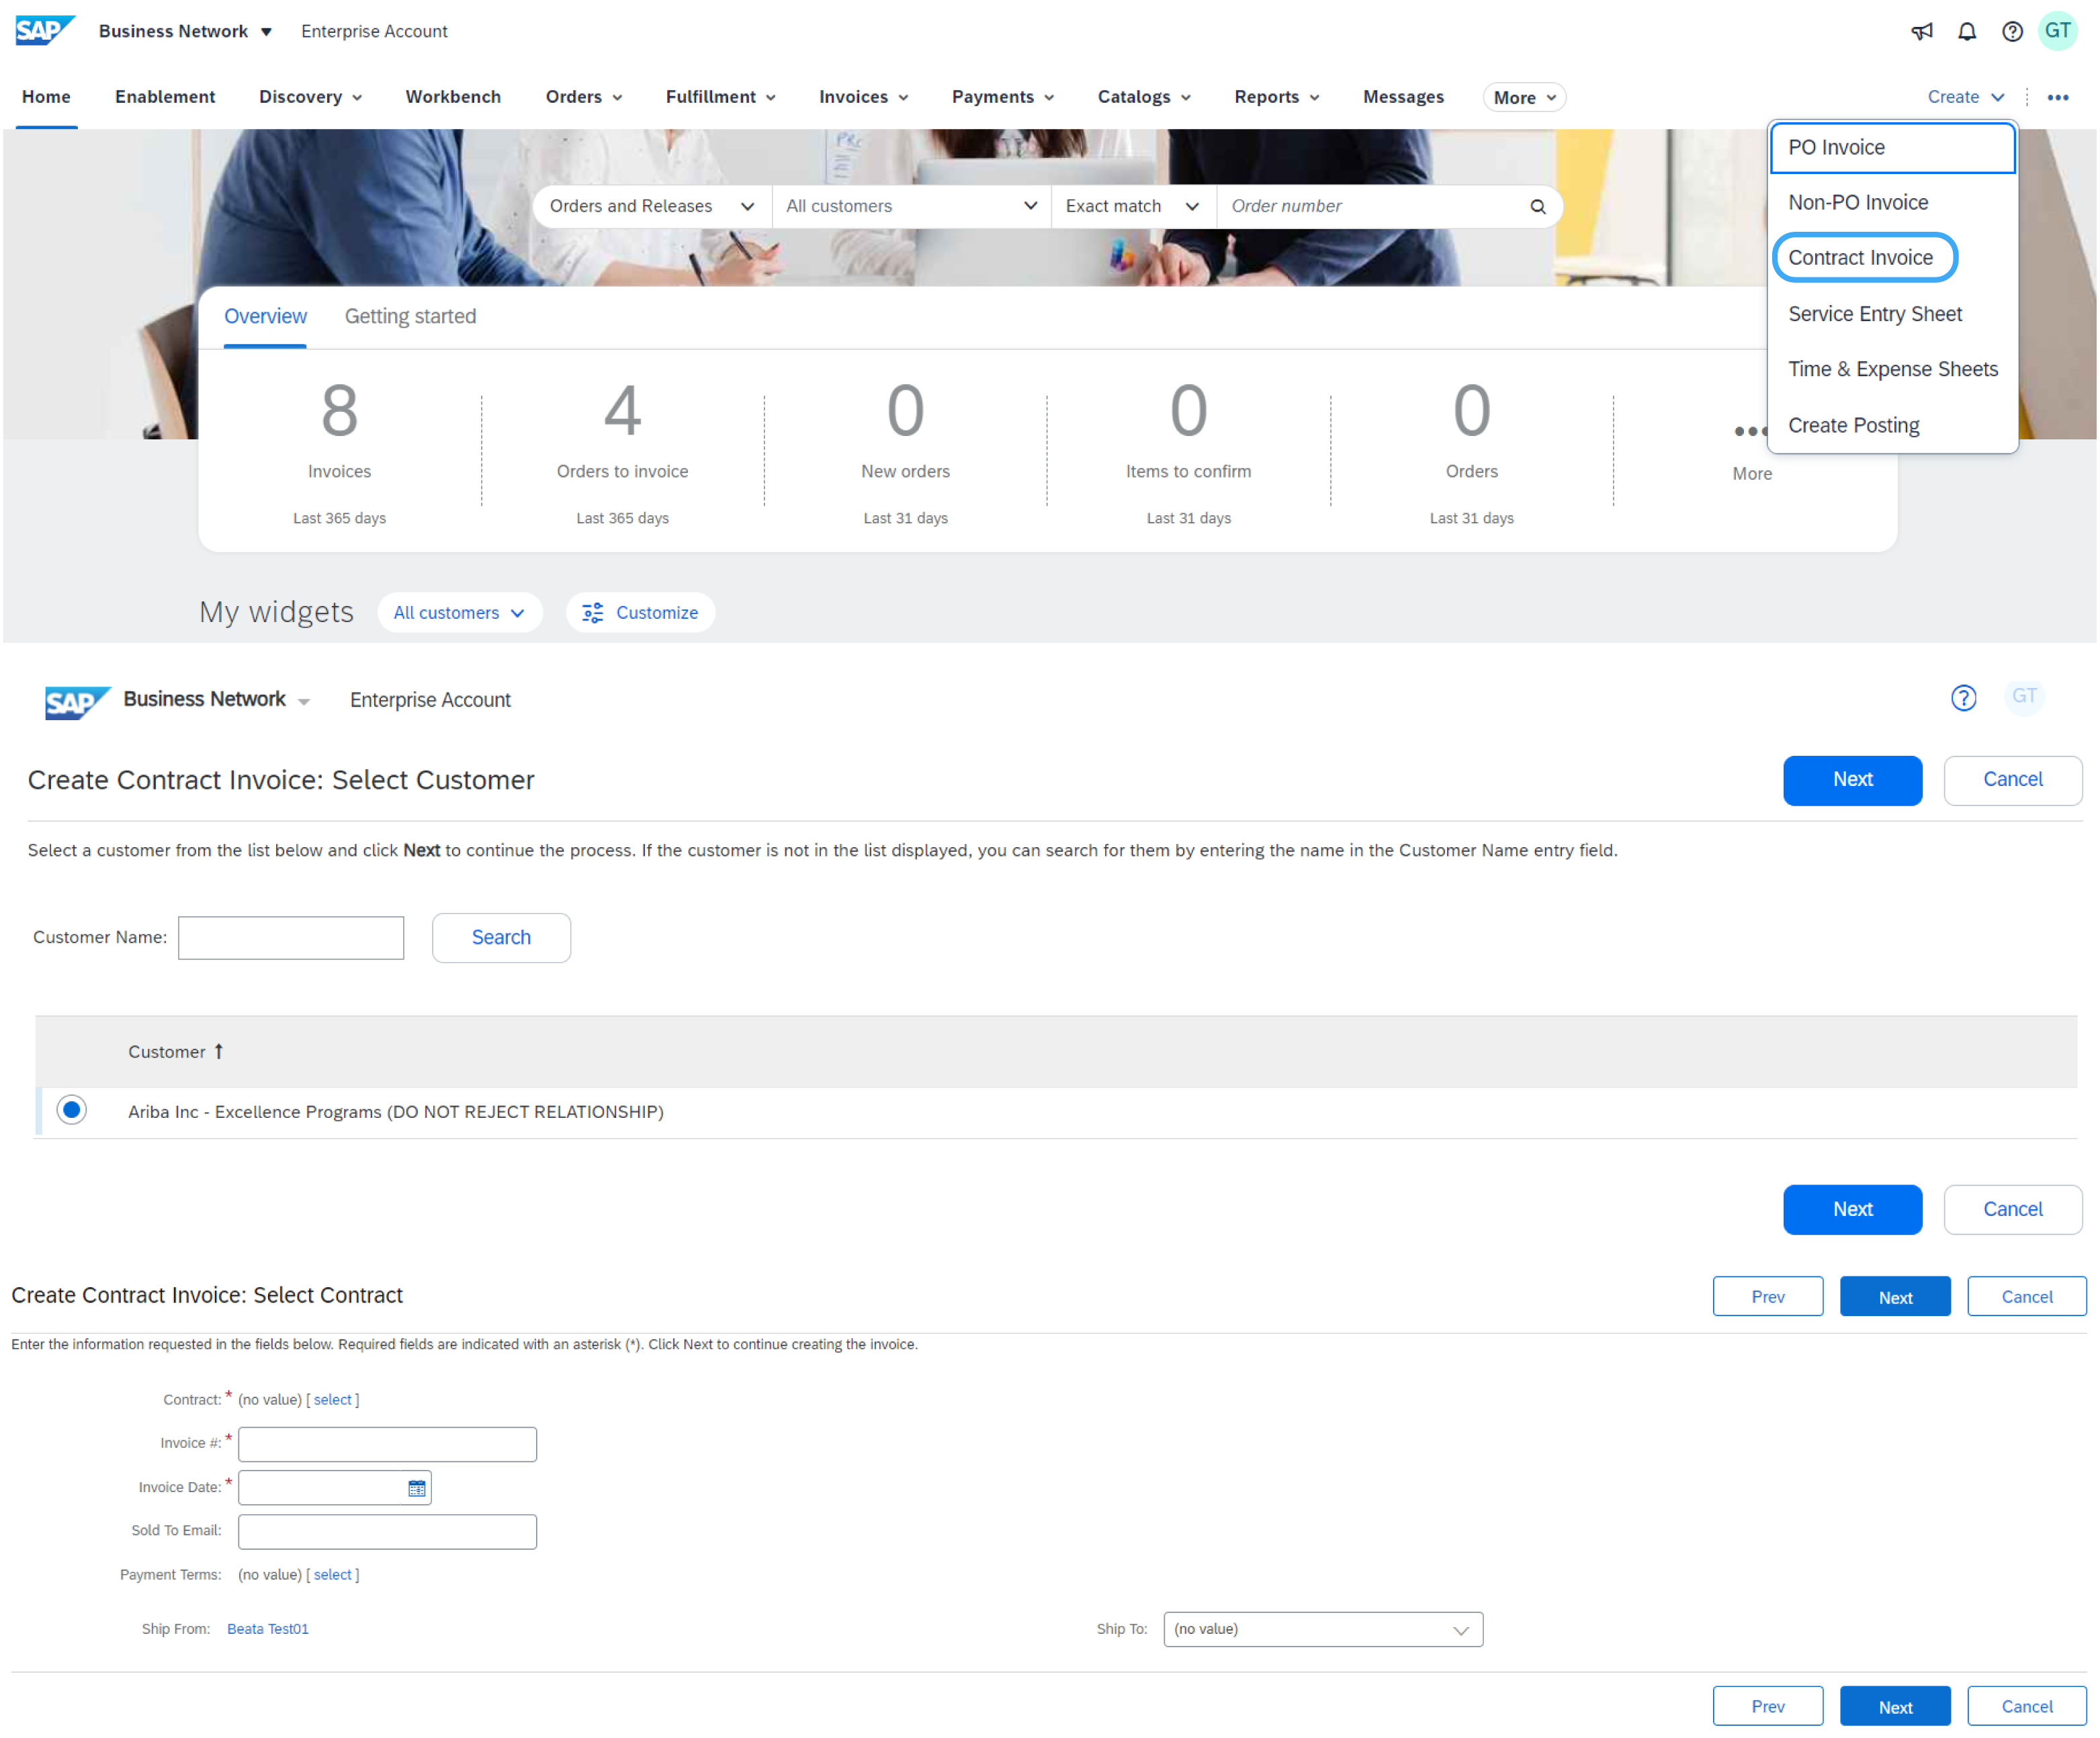
- From the home screen, click the Create dropdown menu, then select Contract Invoice.
- Select the customer name from the customer dropdown list.
- Select the relevant contract and click Done.
- Enter the invoice number.
- Click Next to open the invoice.
Header and Line Level Options
There is an option to add Tax, Shipping, Special Handling, Discount, Comments, and Attachments to Contract Invoices.
To add Line items to the Invoice:
- At Line Level, click Add Item.
- Choose from Non-catalog or Catalog options.
- For Catalog items Select Item > Add Item > Done.
- Enter the required fields marked with an asterisk (*).
- Update the total, click Next, and click Submit to send the invoice to your buyer.
Standard Invoice against a Goods Receipt
With this invoicing method, you can only include received quantities on invoices.
- Click Fulfillment > Goods Receipts.
- Click on receipt number.
- Review the receipt and click on the PO number in Related Documents to open the order.
- The invoice is now pre-populated with the items within the goods receipt. You now can select the items to include and/or modify the quantities on the invoice.
Invoice with no purchase order (Non-PO Invoice)
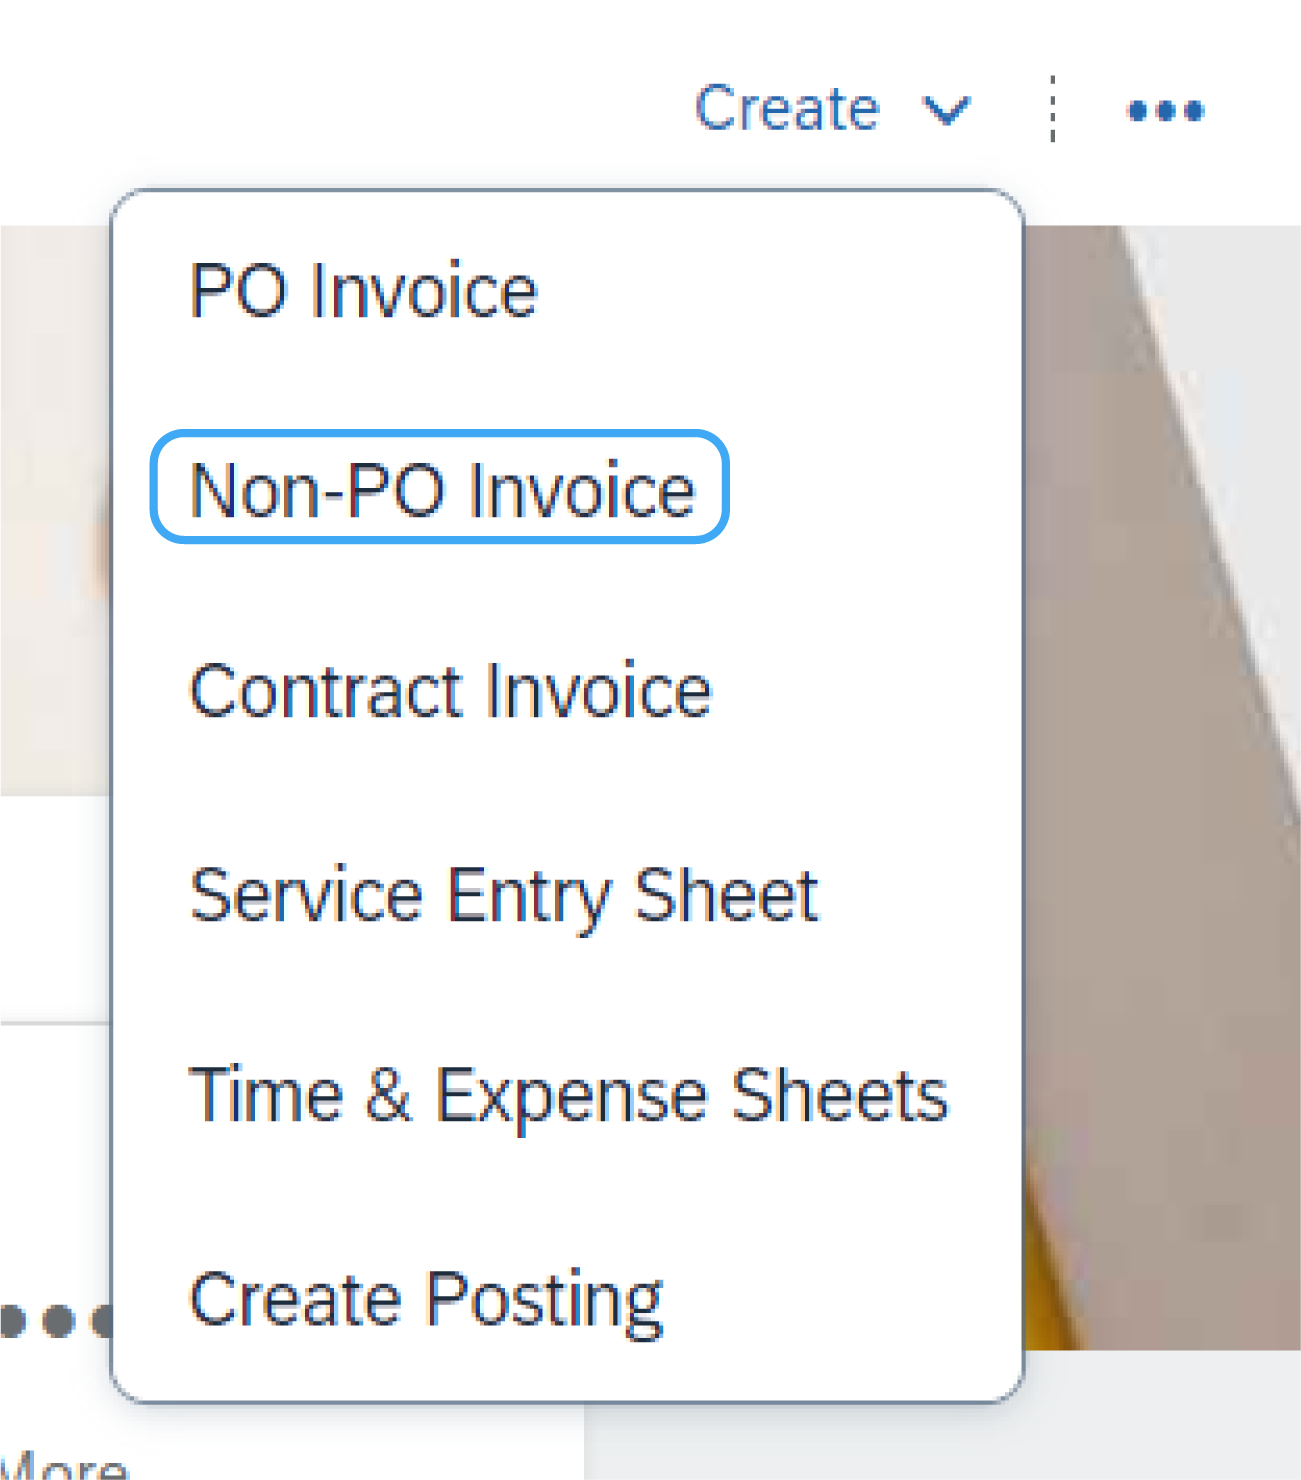
To create an invoice without a PO:
- On the Home page click on Create, then Non-PO Invoice.
- Select your Customer from the dropdown menu.
- Select Standard Invoice.
- Click Next.
Note: If you need to invoice a new customer click Invoice New Customer. Your customer must generate a code for you to create non-PO invoices.
Filling in a Non-PO Invoice
- Complete all required fields marked with an asterisk (*).
- Complete at least 1 of the Order Information Fields. If your customer disables the rule you are not required to enter information in this section.
- It is typically required to add a customer Email address to have the document properly routed to the right approver.
- Use Add Item or Add Service Item to add the details of the item(s) being invoiced. Don't forget to add Tax and Shipping as appropriate per Buyer rules, in the same way as for a PO-based invoice.
- Click Next, then review and hit Submit.
Note: For smoother processing, be certain to provide complete details of the items or services provided.
CSV Invoice
This functionality is only available if enabled by your customer. Please contact your customer if you are interested in this invoicing method.

Download Template
You can access a customer’s CSV file template by going to the More (...) dropdown menu from the Homepage. Then click Templates under the CSV Download title.
Select the correct template by finding your customer's name on the drop-down menu, checking the radio button for Invoice, and clicking Download.
Upload Completed CSV
Once you have filled in the template with your relevant information, you can upload it from the Homepage by clicking More (...) then Invoices under the CSV Upload title.
Select your customer in the dropdown menu, then browse for your file and click Import CSV Invoice.
Note: CSV files are processed by SAP Business Network and forwarded to the customer in the form of a cXML message.
Tip: For more information, please read the CSV Upload Guide available from the Supplier Information Portal.
Credit Memo
Line-Item Credit
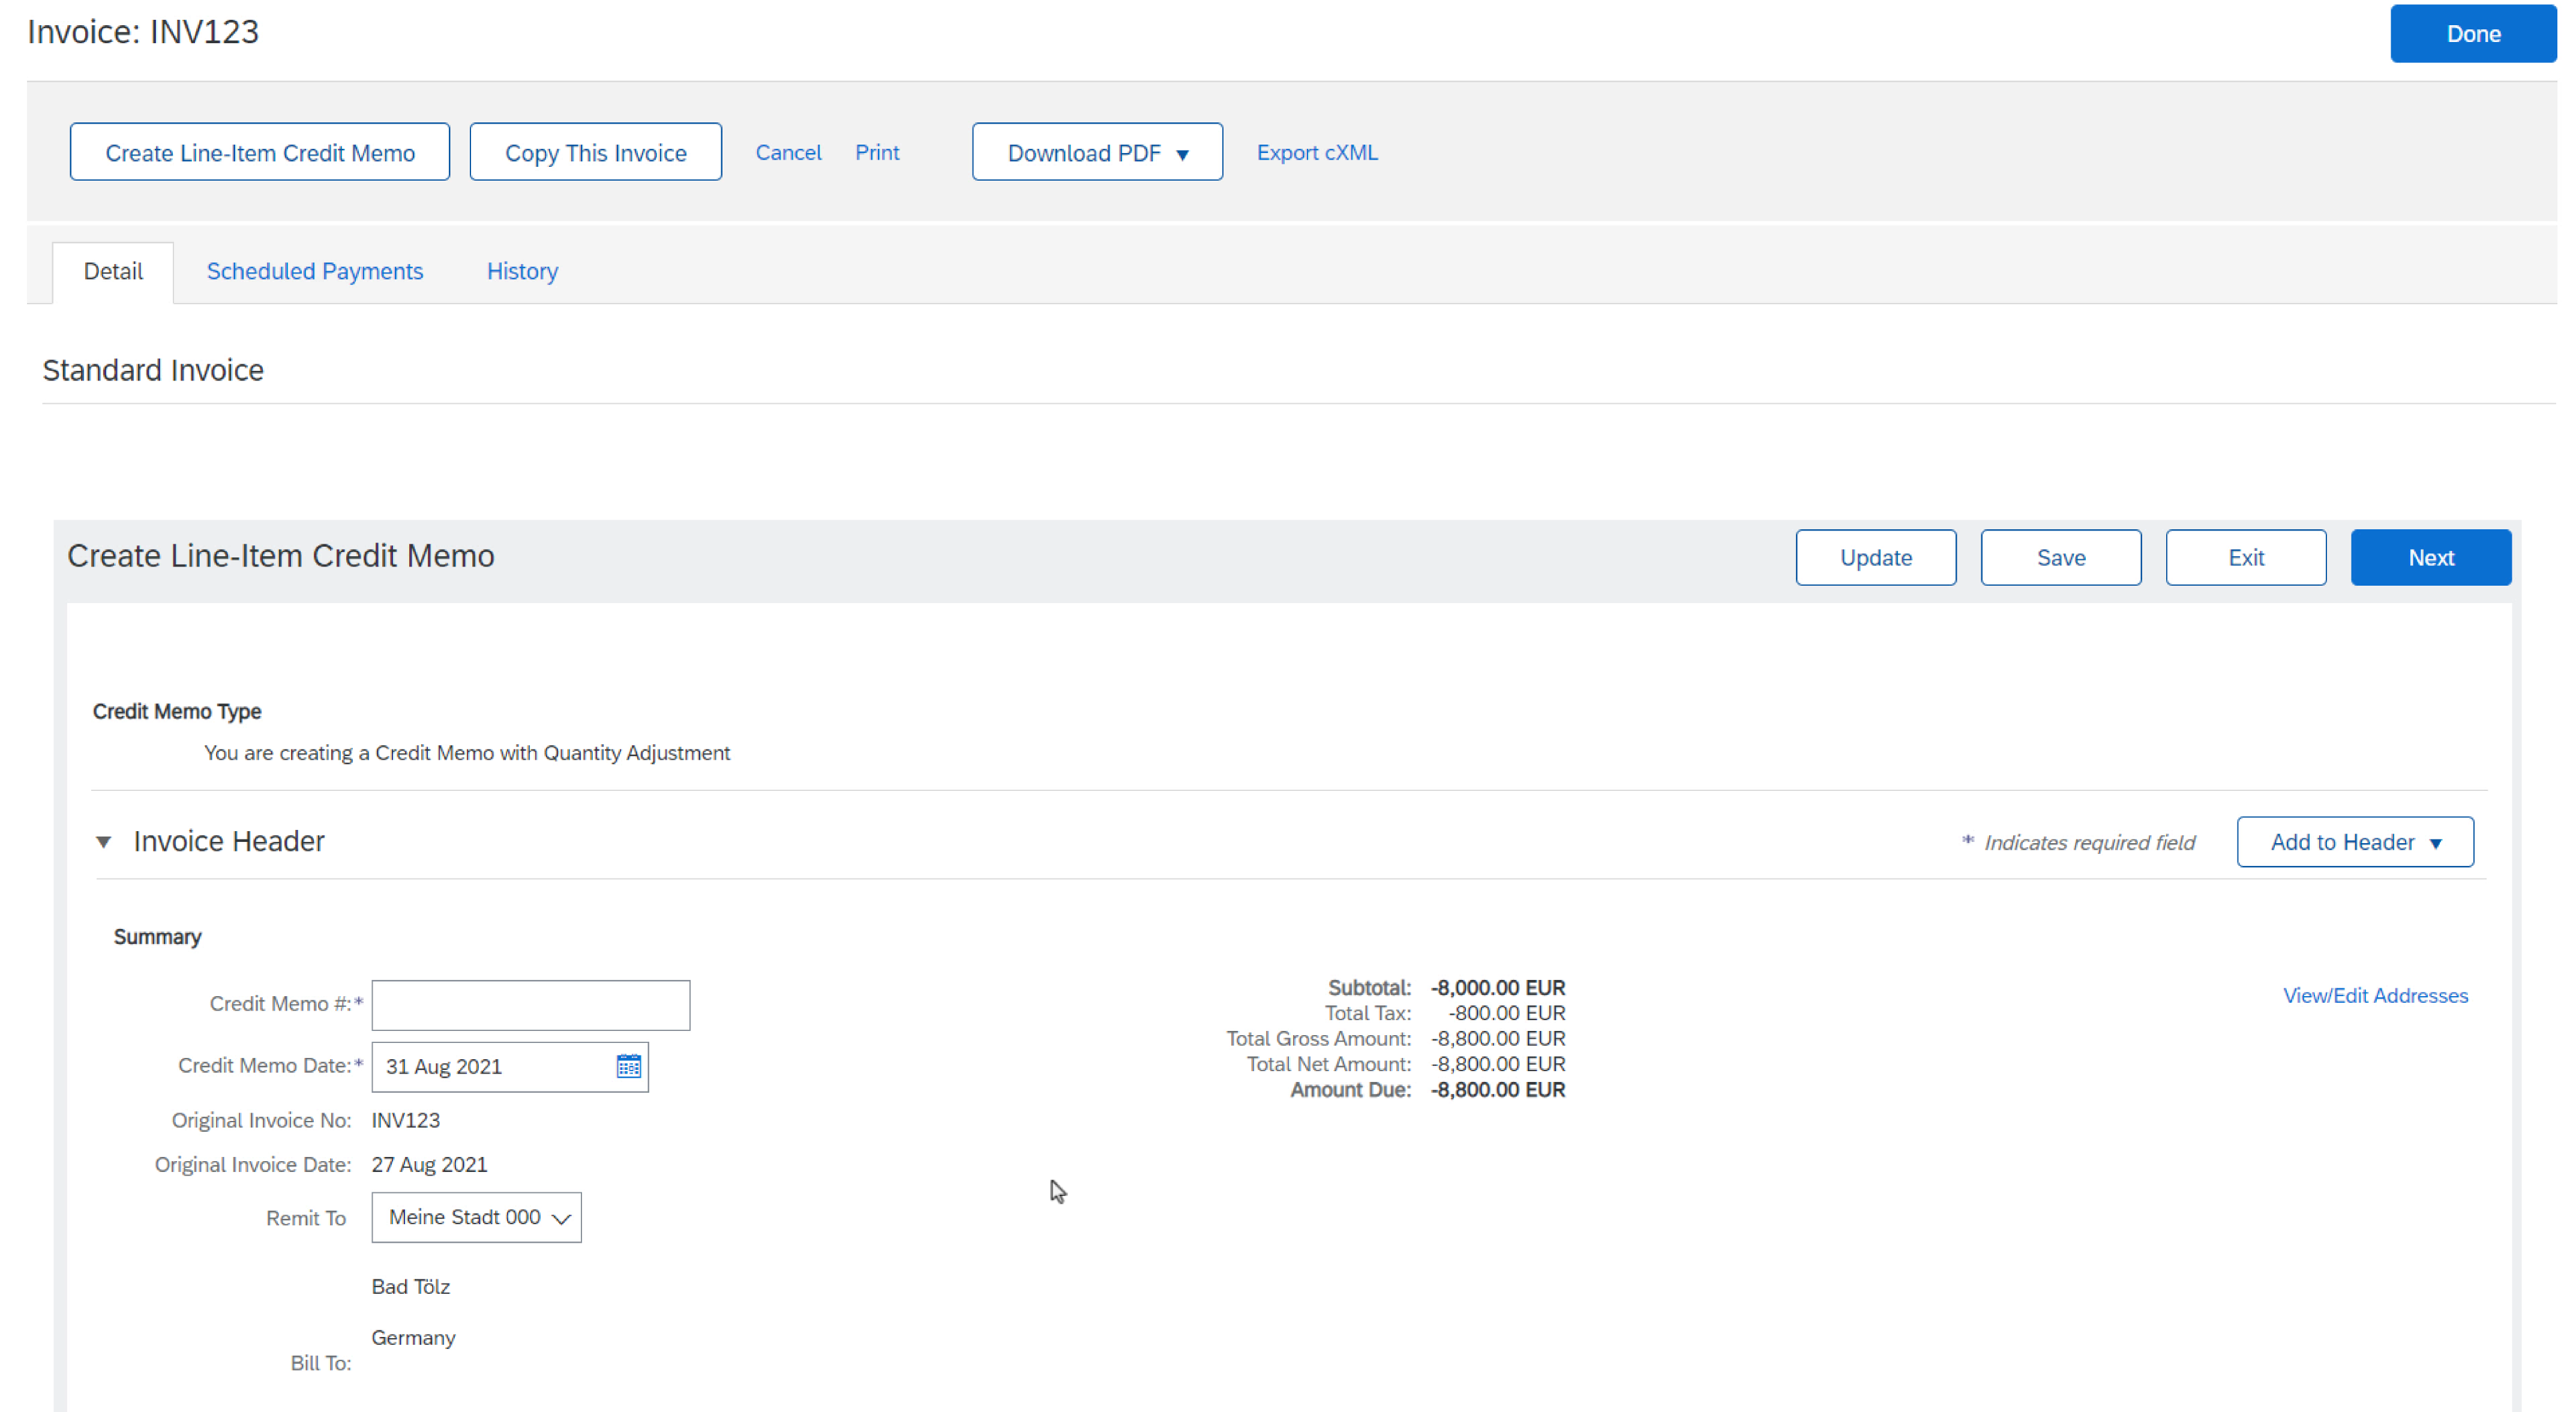
To create a line-level credit memo against an invoice:
- Click the Invoices tab.
- Select your previously created invoice.
- Click the Create Line-Item Credit Memo button on the Invoice screen.
- Complete the information in the form (the amount and taxes will automatically be negative). Make sure that all required fields marked with asterisks (*) are filled in.
- Click Next > Review Credit Memo > Submit.
Header-Level Credit
To create a credit memo against an entire invoice:
- Click the Orders tab or use the workbench.
- Select the PO to be credited.
- Click on Create Invoice > Credit Memo.
- Complete information in the form of a credit memo (the amount and taxes will automatically be negative). Make sure that all required fields marked with asterisks are filled in.
- Click Next > Review Credit Memo > Submit.
Summary Invoice
Feature Overview:
Suppliers can utilize the Orders to Summary Invoice tile to generate summary invoices based on multiple purchase orders and ship notices efficiently.
Key Benefits:
- Reduces the workload of creating and managing multiple invoices.
- Decreases the volume of invoices for your customers to approve and pay.
Enabling the Feature:
Your customers can activate the transaction rule "Allow Suppliers to Send Summary Invoices to This Account" in:
- Default transaction rules
- Supplier group rules
- Country-based invoicing rules
Restrictions:
- Not available for standard account suppliers.
- Orders eligible for grouping must share identical values in Customer, Company Code, Currency, and System ID.
- All orders in the grouping must either have taxes at the header or taxes at the line items.
All orders in the grouping must either have taxes at the header or taxes at the line items.
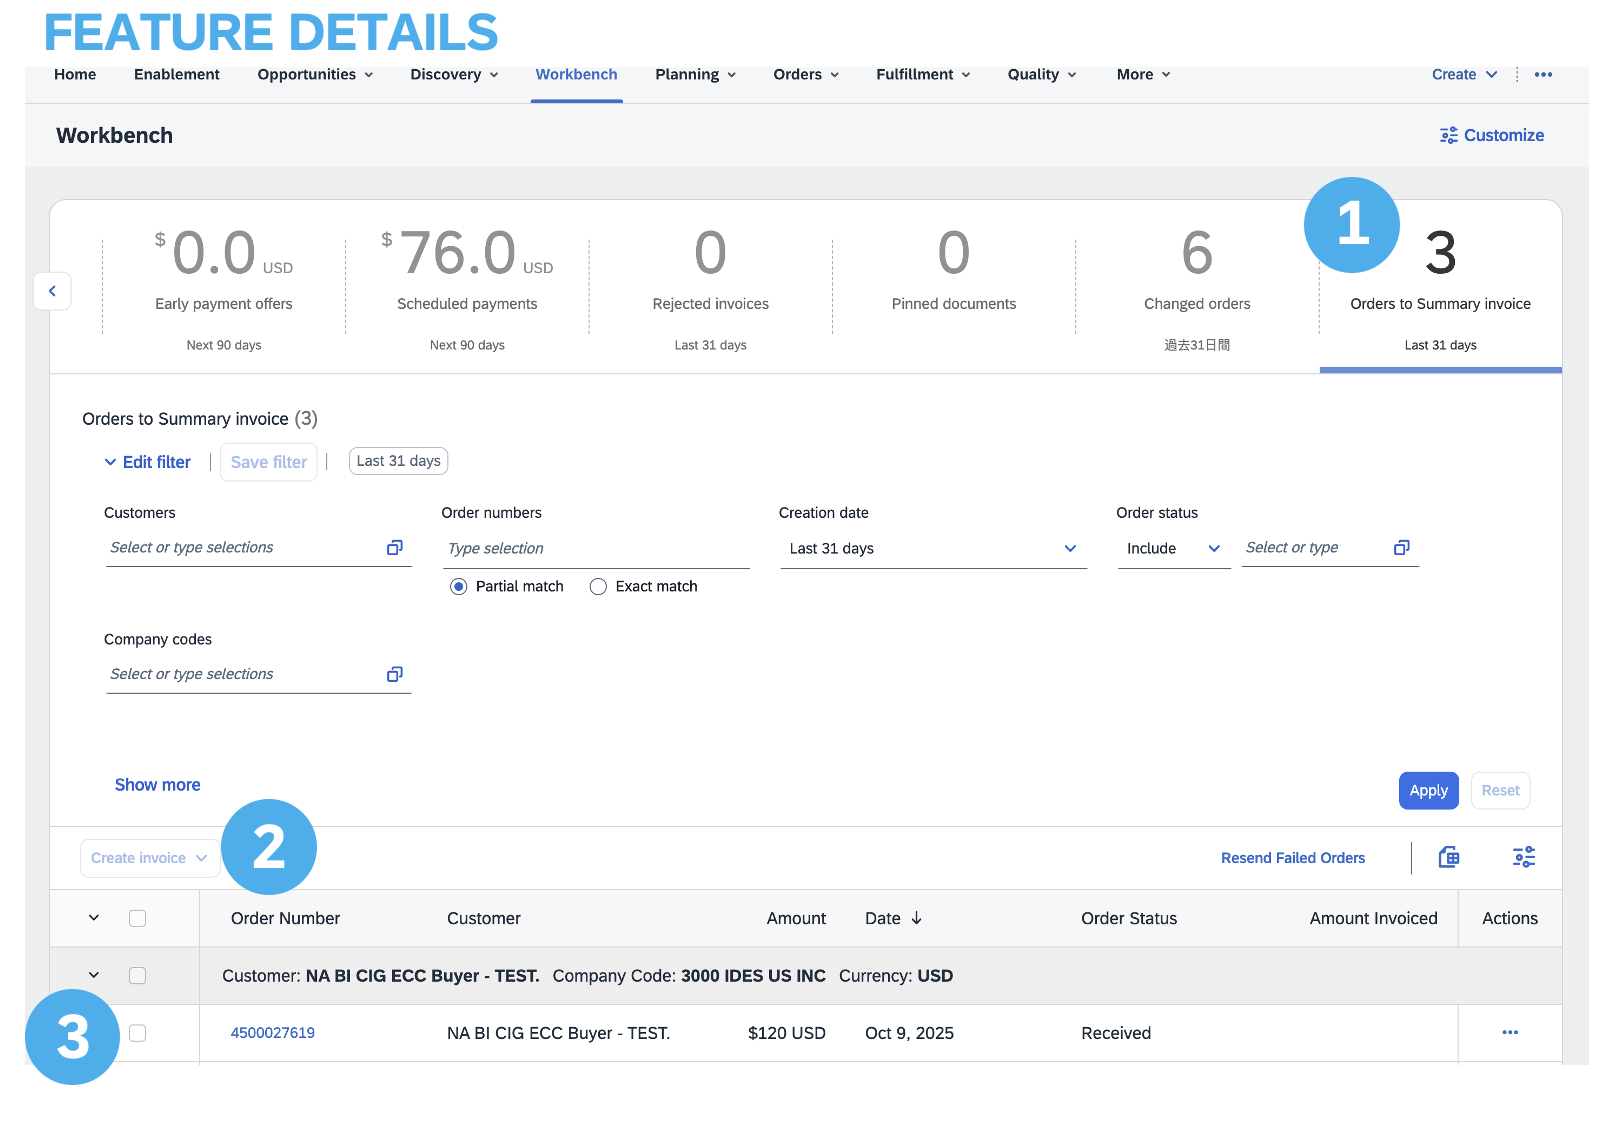
Using the Orders to Invoice Tile:
In the workbench, the Orders to Invoice tile displays eligible purchase orders grouped by:
- Currency
- Customer
- Company Code
- System ID (not visible)
You can enhance grouping criteria by accessing the Column Grouping tab, accessible via the icon above the list of orders. They can then drag and drop columns from the available list to the grouping columns list.
Note: Orders eligible for grouping are initially categorized by Customer, Currency, and Company Code. Additional grouping criteria can be applied as needed.
Other Features on Invoicing (Save, Edit, Reports, etc.)
Create an Invoice Report
- Click the Reports tab from the menu at the top of the page.
- Click Create.
- Enter the required information. Select an Invoice report type (e.g. Failed Invoice).
- Click Next.
- Specify Customer and Created Date in Criteria.
- Click Submit.
- You can view and download the report in CSV format when its status is Processed.
- Bronze members (and higher) may choose Manual or Scheduled reports. Set scheduling information if the Scheduled report is selected
Note: For more detailed instructions on generating reports, refer to the SAP Business Network Guide found on the help page of your account.
Invoice Reports – Benefits
Invoice reports provide information on invoices sent to customers for tracking invoices over time or overall (e.g. invoice volume for some time).
- Reports can be created by the administrator or a user with appropriate permissions.
- Reports help provide additional information and details on transactions on the Network in a comprehensive format.
Review, Save, or Submit Invoice
When editing an invoice, you can refresh and check for errors at any moment by clicking on Update.
In the event of errors, there will be a notification in red where information must be corrected.
When you finish editing an invoice and the system spots no errors, click Next to review your invoice for accuracy from the Review page. Once satisfied, click Submit to send the invoice to your customer.
Alternatively, you can Save your invoice at any time during invoice creation to work on it later. Resume working on the invoice by selecting it from Invoices > Drafts from the Homepage.
Note: draft invoices are kept up to 7 days.
Copy an Existing Invoice
To copy an existing invoice to create a new invoice:
- Click the Invoices tab from the homepage or use the workbench.
- Select the radio button for the invoice you want to copy, and click Copy. OR Open the invoice you want to copy.
- On the Details tab, click Copy This Invoice.
- Enter a new invoice number.
- For VAT lines, make sure the date of supply at the line level is correct.
- Edit the other fields as necessary.
- Click Next, review the invoice, then submit it.
Check Invoice Status – Routing Status
If you configured your Invoice Notifications, you will receive emails regarding invoice status. You can also check invoice status by selecting your invoice in the Invoices tab or the Workbench.
- Routing Status: Reflects the status of the transmission of the invoice to your customer via SAP Business Network.
- Obsoleted: You canceled the invoice.
- Failed: Invoice failed your customer's invoicing rules. Your customer will not receive this invoice.
- Queued: SBN received the invoice but has not processed it.
- Sent: SAP Business Network sent the invoice to a queue. The invoice is awaiting pickup by the customer.
- Acknowledged: Your customer invoicing application has acknowledged the receipt of the invoice.
Check Invoice Status – Invoice Status
The Invoice Status reflects the status of your customer’s action on the Invoice.
- Sent: the invoice is sent to your customer but they have not yet verified the invoice against purchase orders and receipts.
- Cancelled: your customer approved the invoice cancellation.
- Paid: your customer paid the invoice/is in the process of issuing payment.
- Approved: your customer has verified the invoice against the purchase orders or contracts and receipts and approved it for payment.
- Rejected: Your customer has rejected the invoice or the invoice failed validation by SBN. If your customer accepts the invoice or approves it for payment, the invoice status is updated to Sent (invoice accepted) or Approved (invoice approved for payment).
- Failed: SAP Business Network experienced a problem routing the invoice.
Review Invoice History – Check Status Comments
- Click on the History tab to view status details and invoice history.
- History and status comments for the invoice are displayed.
- Transaction history can be used in problem determination for failed or rejected transactions.
- When you are done reviewing the history, click Done.
Modify an Existing Invoice
Modifying an existing invoice: Canceling, editing, and resubmitting – is contingent upon permissions granted by your customer. Suppliers are only able to edit draft invoices; sent invoices cannot be modified. The cancellation option is available at the discretion of the customer. To initiate the process:
- Locate and open the invoice in question.
- If permitted, click 'Cancel' to change the status of the invoice to 'Canceled.'
- Should editing be permissible, select the failed, canceled, or rejected invoice and click 'Edit.'
- Fill in the necessary details as per the usual process.
- Finally, click 'Submit' to send the edited invoice
Invoice Archival
Configuring invoice archiving allows you to specify the frequency, immediacy, and delivery of zipped invoice archives.
- Click on your initials in the top right corner, then select Settings > Electronic Invoice Routing.
- Select the tab Tax Invoicing and Archiving.
- Scroll down to Invoice Archival and select the link for Configure Invoice Archival.
- Select frequency (Twice Daily, Daily, Weekly, Biweekly, or Monthly), choose Archive Immediately to archive without waiting 30 days and click Start.
- You may navigate back to the Tax Invoicing and Archiving screen to subscribe to Long-Term Document Archiving for an integrated archiving solution.
Note: If you want SAP Business Network to deliver automatically archived zip files to you, also enter an Archive Delivery URL (otherwise you can download invoices from your Outbox, section Archived Invoices). After Archive Immediately starts you can either Stop it or Update Frequency at any time.
Debit Memo
Debit memos are invoices issued to inform customers of corrected prices after invoice acceptance, typically for billing problems such as price discrepancies or changes in taxes or shipping amounts.
SAP Business Network supports two types:
PO-based line-item debit memos and Non-PO line-item debit memos. To create and manage these memos, users must have specific permissions. However, certain restrictions apply, including the inability to create header-level debit memos, create line-item debit memos against invoices from SBN invoice conversion services, or increase quantities for an invoice using line-item debit memos. Additionally, line-item debit memos cannot be created for orders that haven't been invoiced, nor can they be generated via CSV file upload or against service invoices based on service sheets.
Debit Memos Workbench Overview:
The Debit Memos Workbench tile displays the total number of debit memos you’ve created.
When you click the tile, a list of debit memos is shown in the workbench.
1.You can apply and edit filters to refine the list.
2.Click Settings to customize the table headers displayed in the debit memo list.
3.Use the three-dot icon under the Actions column to edit individual debit memos.
4.You can also download the list as an Excel file for offline use.

It's essential to familiarize yourself with the specific transaction rules applicable to your customer for a deeper understanding of the scope of invoicing.
Use the links below to keep learning about Invoices:

|
