|
| ||||||||
|
| ||||||||
Material OrdersA material order refers to a procurement process that requests specific physical items, materials, or goods from suppliers or customers. This process is fundamental for businesses that require raw materials, components, or finished products to manufacture goods or provide services. Material orders are commonly initiated through a Purchase Order (PO), which outlines the details of the requested items, including quantity, specifications, delivery dates, and pricing agreements. Material orders play a critical role in supply chain management, ensuring that businesses have the necessary resources to operate efficiently and meet customer demand. Upon receiving a material order, you will typically confirm the order through an Order Confirmation, verifying your acceptance of the terms and conditions outlined in the PO. This confirmation serves to confirm the agreement between you and your customer and allows for any necessary adjustments or modifications to the order before fulfillment.
When receiving a PO, some customers may require you to promptly acknowledge it with an order confirmation. However, this requirement varies, and while some customers may not mandate it, they might still allow you to confirm the order if needed. This serves several purposes:
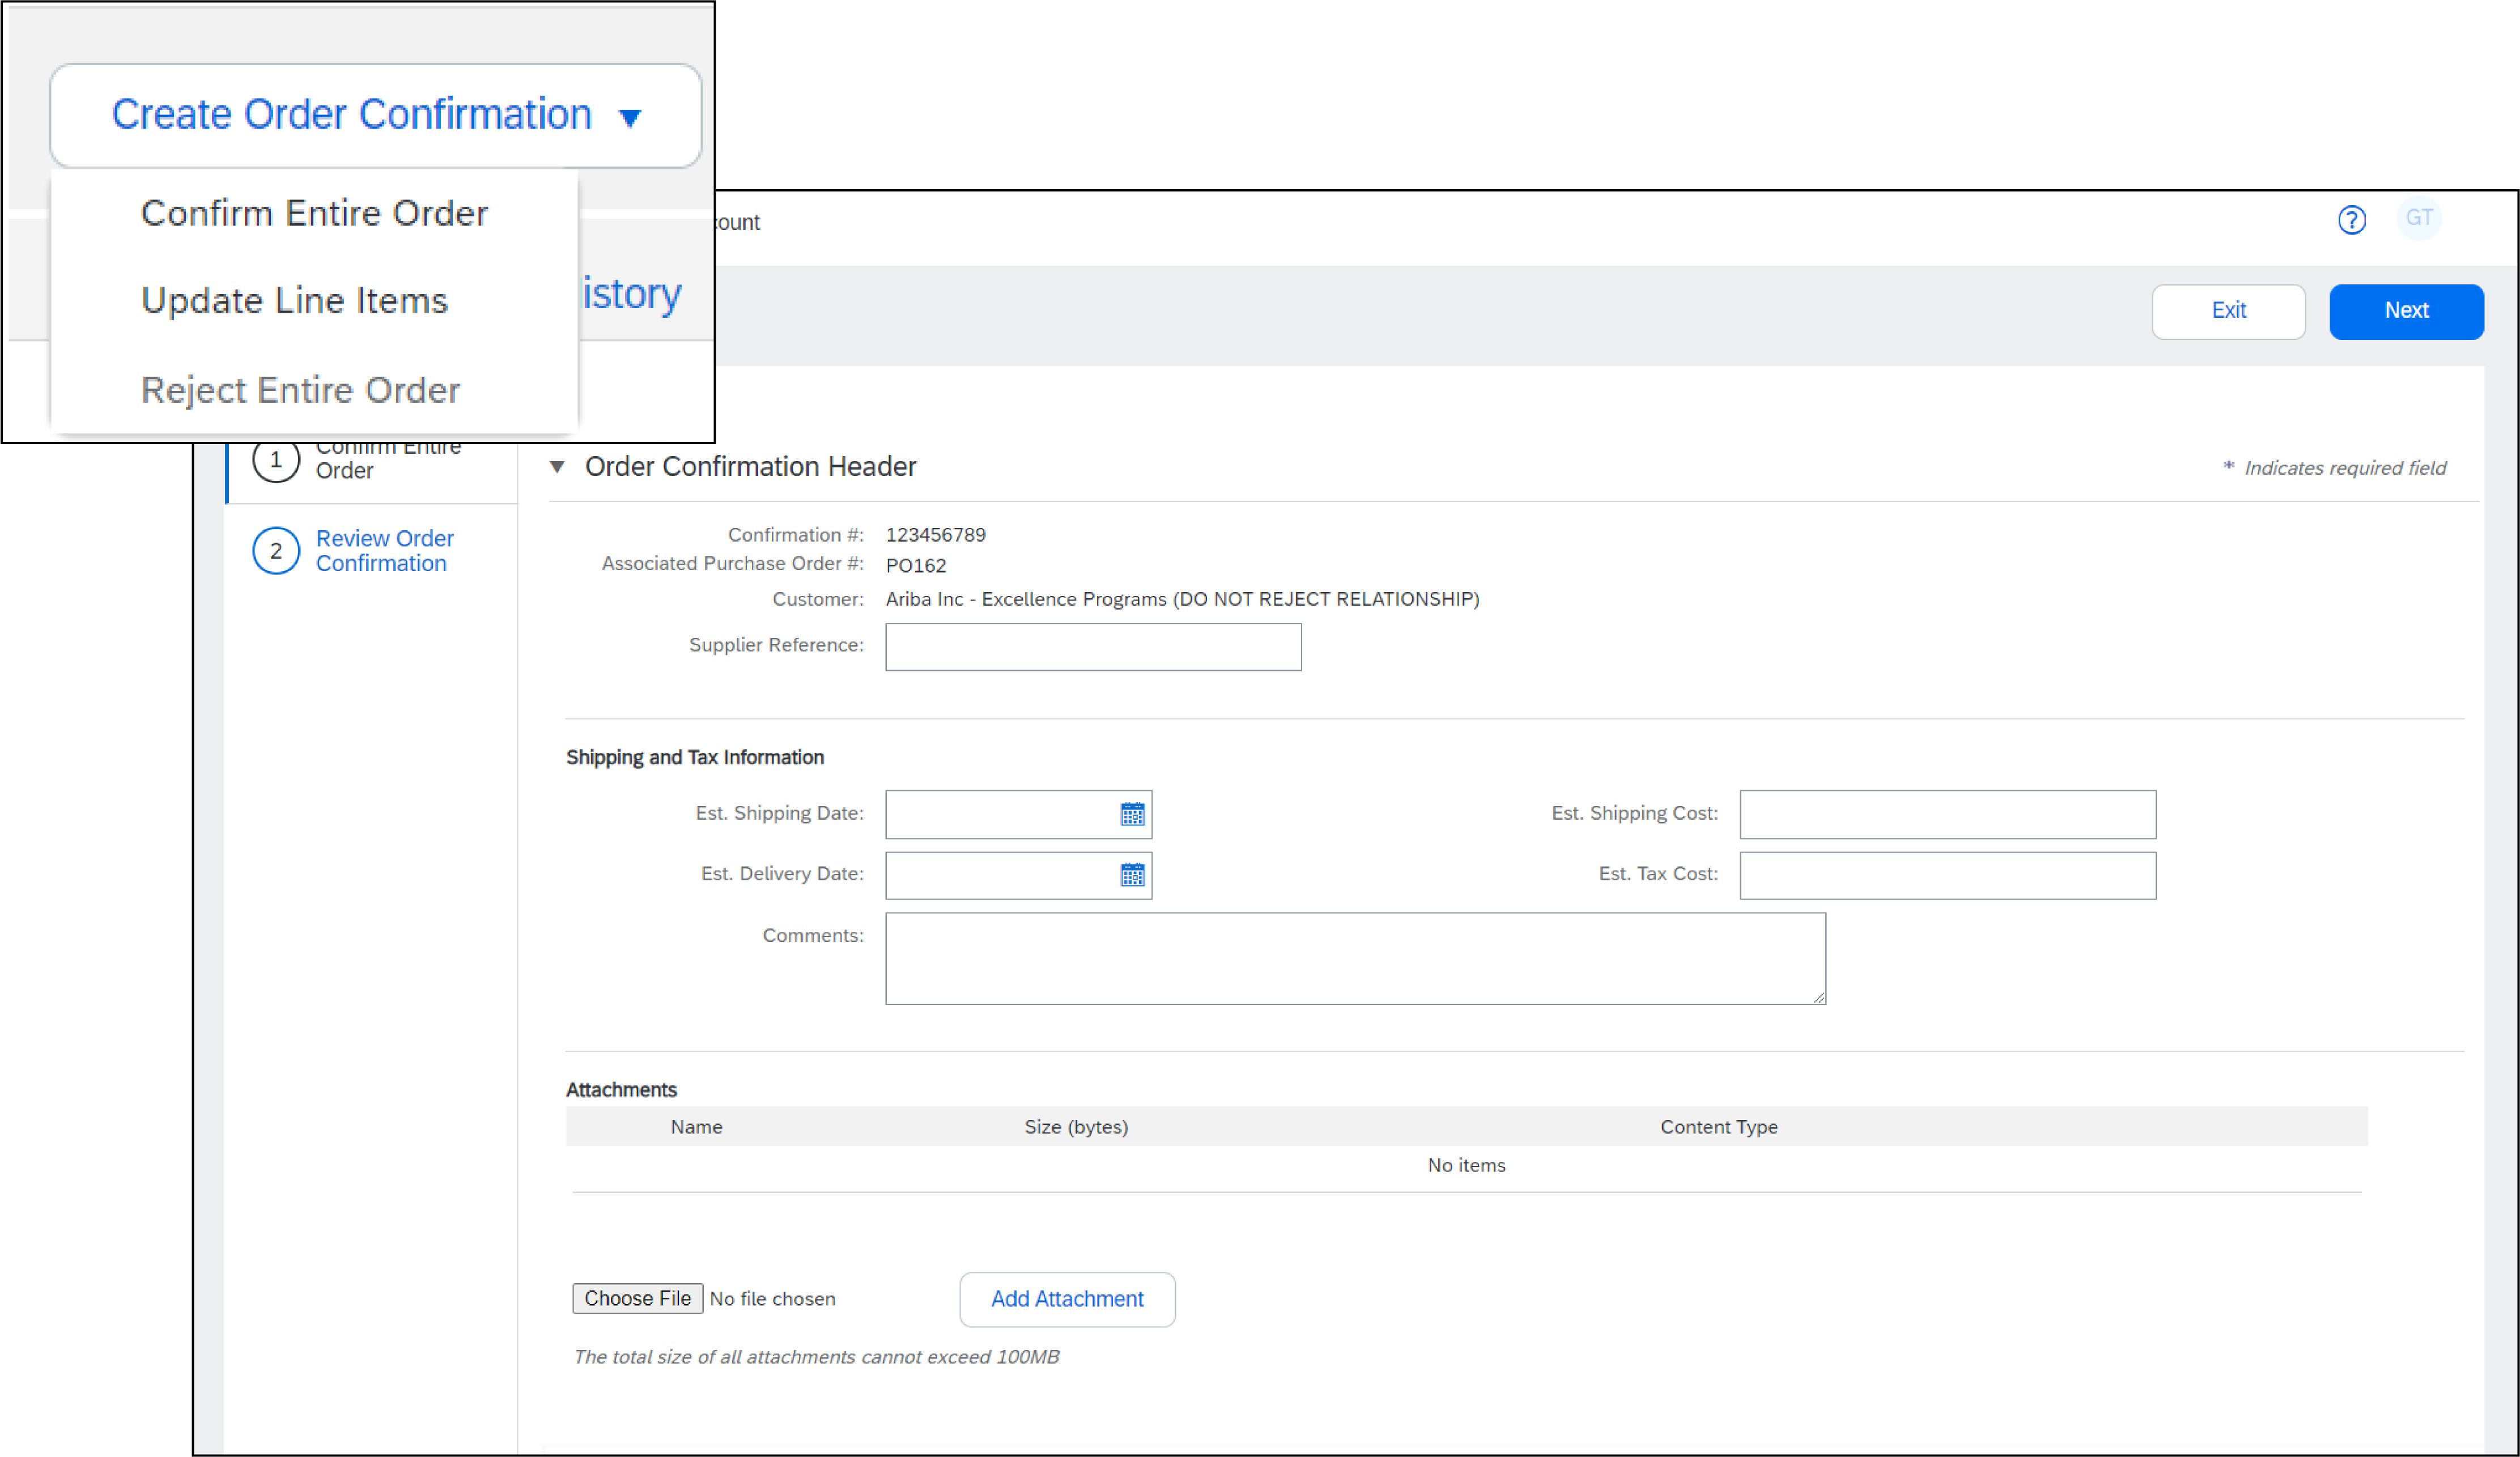
Note that while the Order Confirmation is highly valuable and sometimes mandatory, some customers may not require it. Even if you send it, they may not integrate it into their internal system. Nonetheless, it's important to adhere to this process for those who do require it. For Service POs, you might be required to submit a Service Sheet. Please consult the Service PO section for detailed instructions on this process. Always refer to the instructions provided by your customer to determine which specific documents are required for each order. This ensures smooth processing and fulfillment of orders by your customer's requirements. Note: If you are using a Standard Account, you can also visit this page or watch this video playlist for dedicated instructions. Order Confirmation Create a confirmation to inform the buyer regarding the order status. Steps to Confirm Entire Order: From the PO view, click Create Order Confirmation > Confirm Entire Order.
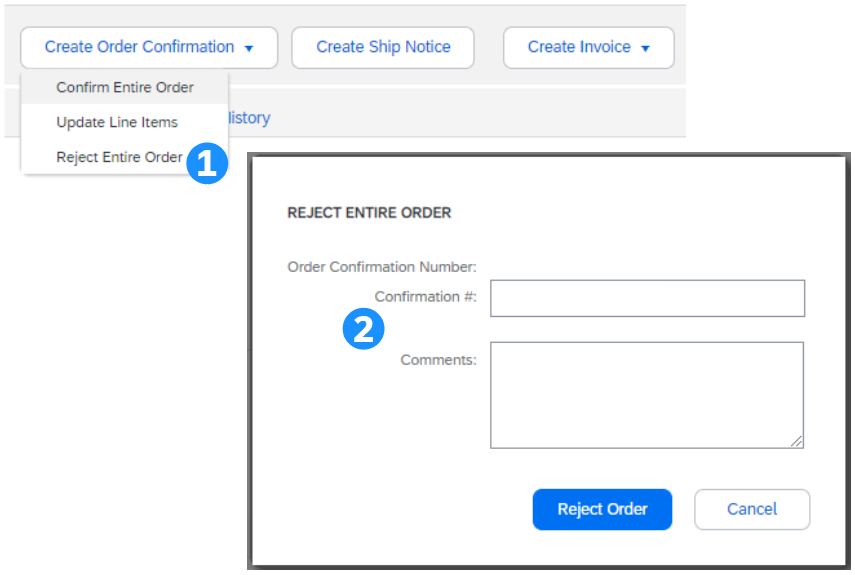
Reject Entire Order
Once the order confirmation is submitted, the Order Status will display as Rejected. Note: your customer might not allow you to reject Orders for business or technical reasons. In such cases, the option to reject will be greyed out.
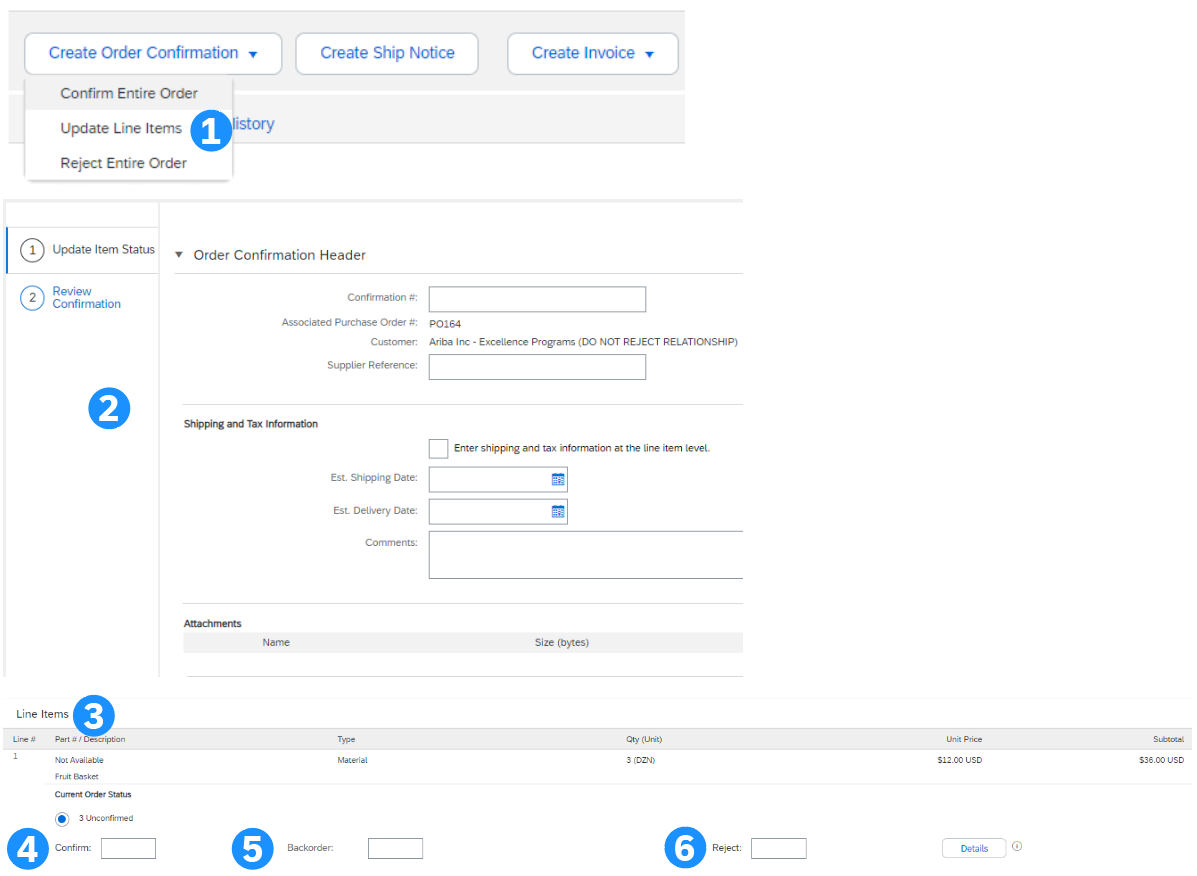
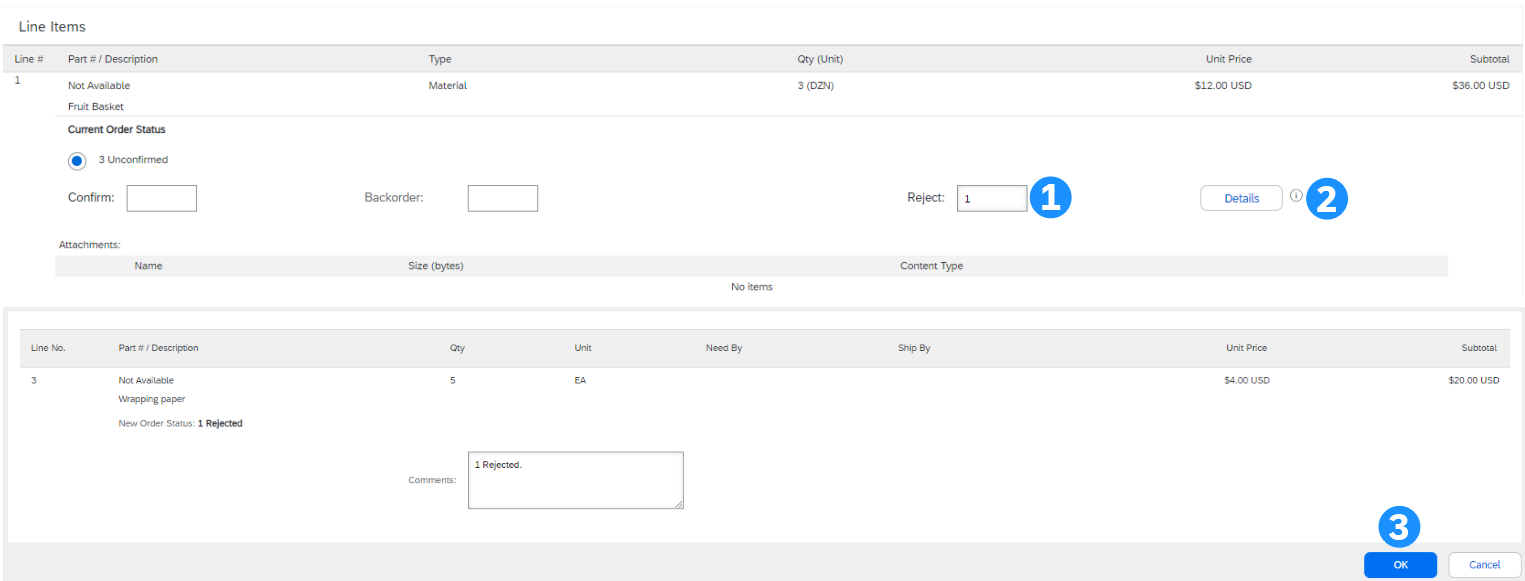
Update Line Items
Once you're done, click on Next. Then review the Confirmation before clicking Submit.
If you want to change the purchase order, you must typically wait for your customer to update it by sending a revised order. Subsequently, as a form of acknowledgment, you can generate a final PO confirmation to validate your satisfaction with the revised version. If you don't confirm, you will be unable to process the order.
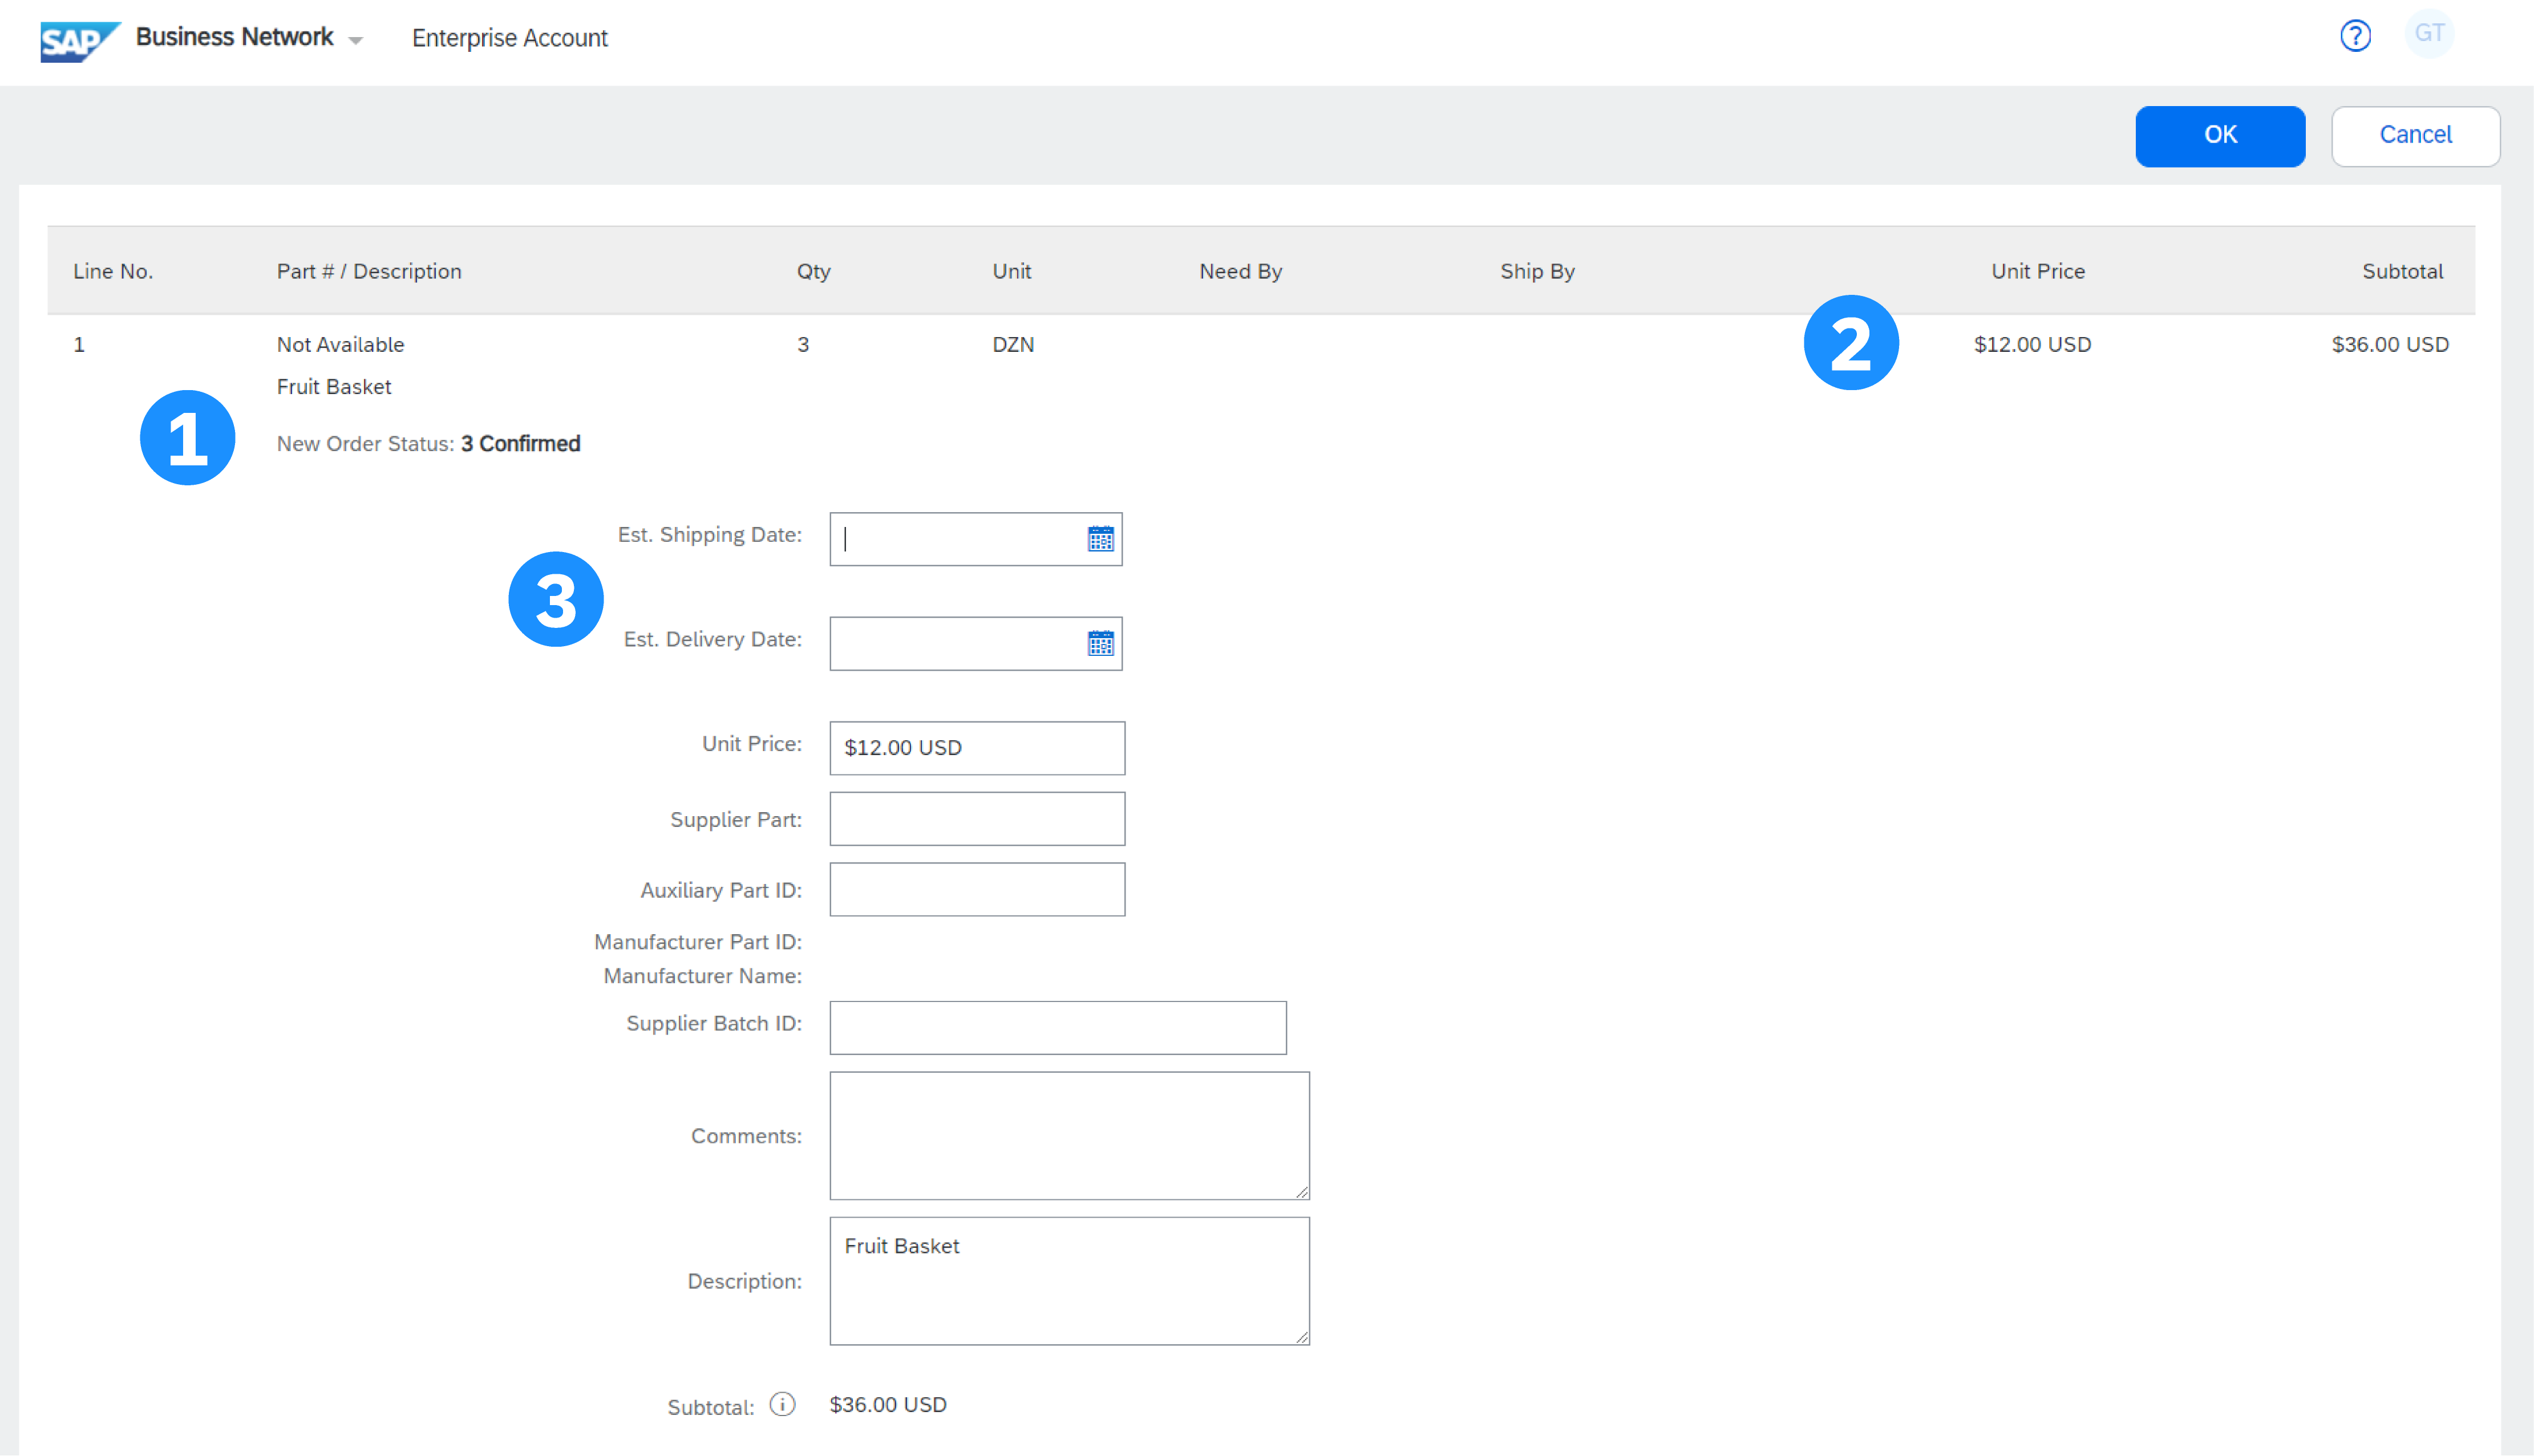
Update Line Items: Confirm/Update Details
Note: each customer relationship might apply different transaction rules and make some fields not editable Update Line Items: Backorder
Update Line Items: Reject
Update Line Items: Multiple Changes Continue to update the status for each line item on the purchase order. Once finished, click Next to proceed to the review page.
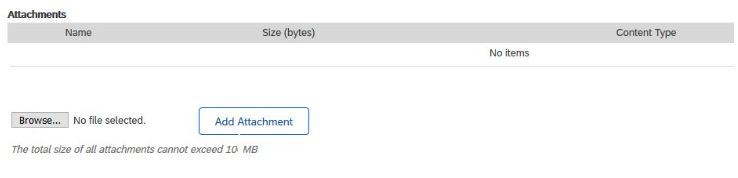
Adding Attachments If your customer permits, you can add attachments to your PO Confirmation. Simply browse your computer for the relevant file(s) and click on Add Attachment.
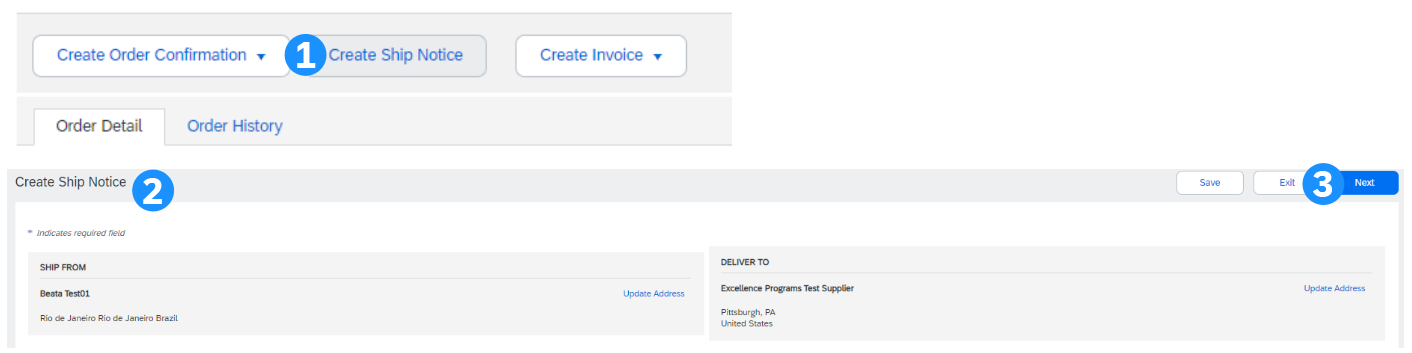
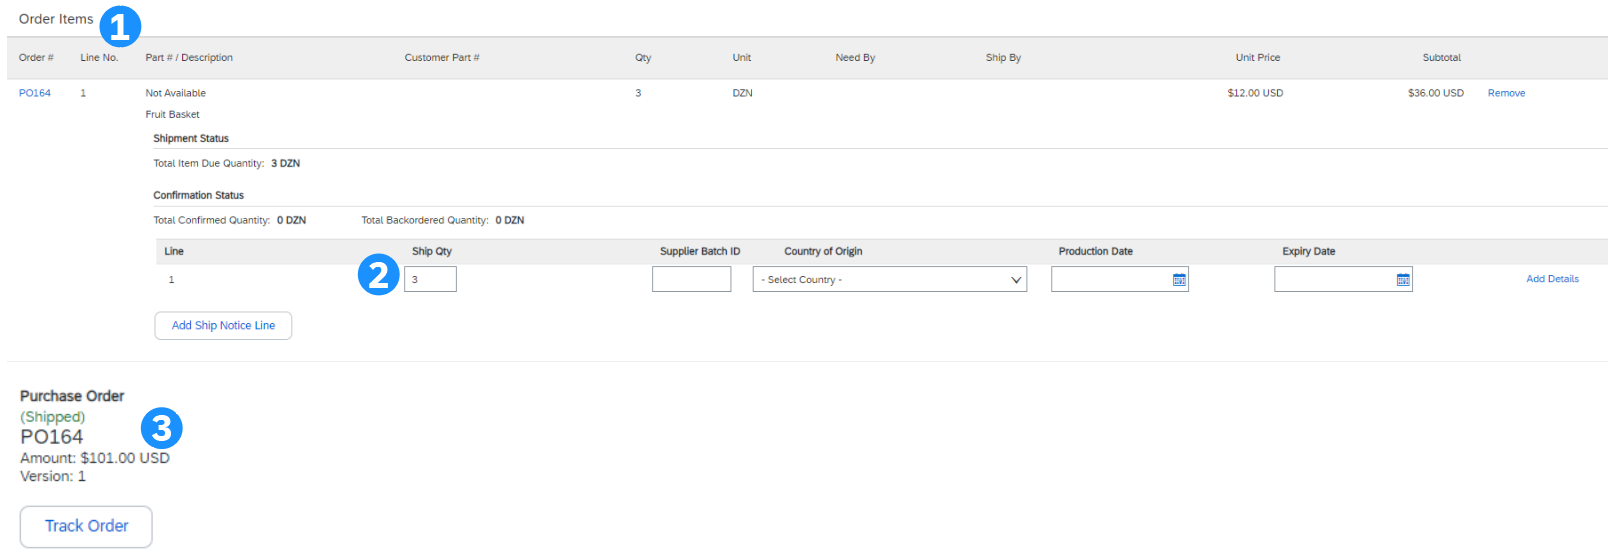
Ship Notice Create a shipping notification to inform customers about the current status of their order. Create Ship Notice Initiate a Ship Notice once items are prepared for shipping. It's possible to send multiple Ship Notices per Purchase Order (PO).
Please adhere to specific instructions provided by the customer regarding the required information to be included in Ship Notices
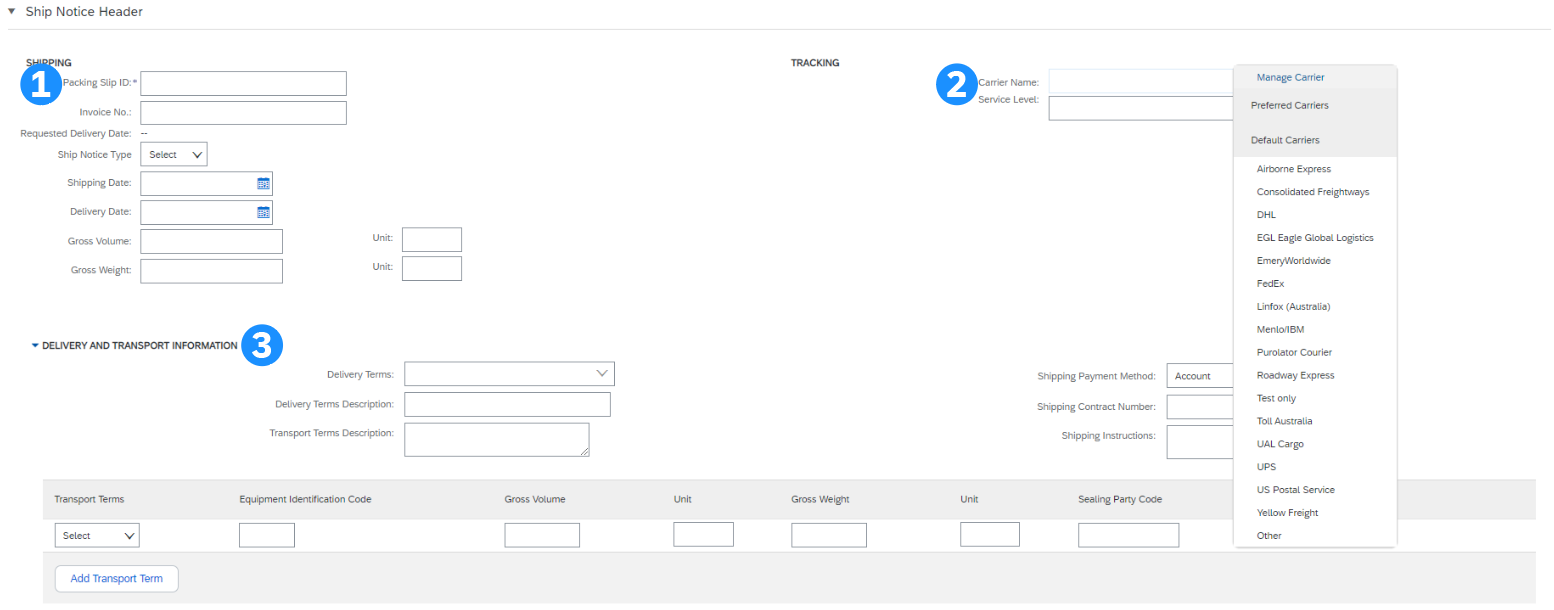
Header – Shipping, Tracking and Transport Information
The information you need to provide depends on your existing business processes and the transaction rules set up by your customer.
Line Item Details
Note: Ship Notices provide improved communications to help avoid unnecessary calls to the order support department.
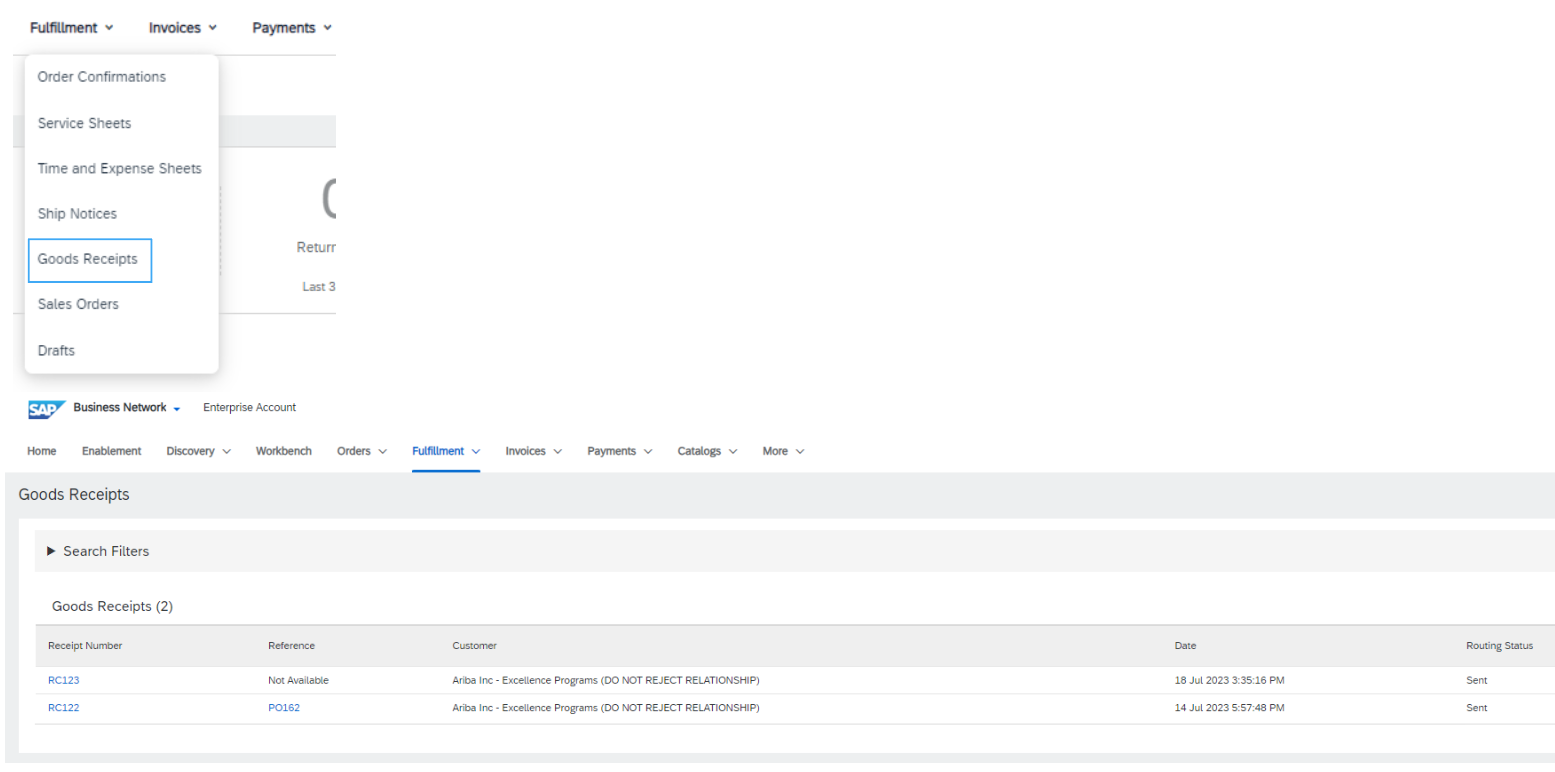
Goods Receipt Some customers will send you a Goods Receipt Notice (GRN) to confirm they effectively received the shipped goods. This typically triggers the invoicing/payment process. What is a Goods Receipt Notice When enabled, GRNs inform you of what your customer has received in their system from the shipment you sent. The GRN may be sent for informational purposes only, but it can also be necessary for suppliers to generate invoices for the actual goods received. It often serves as the trigger for the invoicing process. In some cases, the 'Create Invoice' button will remain inactive until a GRN is received. Configuring Notifications for Goods Receipt: To ensure timely invoicing, suppliers can configure notifications for Goods Receipt Notices. Follow these steps:
PO Status Updates: When goods receipts are enabled, some additional PO statuses are also available. Similar to the 'Shipped' status, when a GRN is received, the PO status will change to 'Partially Received' or 'Received'. Locating Goods Receipts You can find Goods Receipts under the Fulfillment tab. Click on the Receipt number to open it and display the details.
This content provides clear guidance on how to confirm, update, and reject your purchase orders, as well as create ship notices for your material POs. To better understand these procedures in practice, you can access the links below:
These resources provide a practical insight into the mentioned processes. Feel free to explore them to deepen your understanding

|