Email


Basic Configuration Settings

This section is designed for the Administrator of your SAP Business Network to complete registration, perform account configurations, and create additional user accesses to the account. 

Please refer to the instructions provided by your customer to know which sections are essential to complete before starting to transact documents.

Basic Configuration Settings

This section will teach you how to navigate and configure your account settings. First, you'll learn how to set up your company profile and then configure the network settings to receive important customer notifications.


Complete Your Profile

  1. Select Company Profile from the Account Settings dropdown menu.
  2. Complete all suggested fields within the tabs to represent your company best.

    Note: The more complete a profile, the higher the likelihood of increasing business with existing and prospective customers.
     

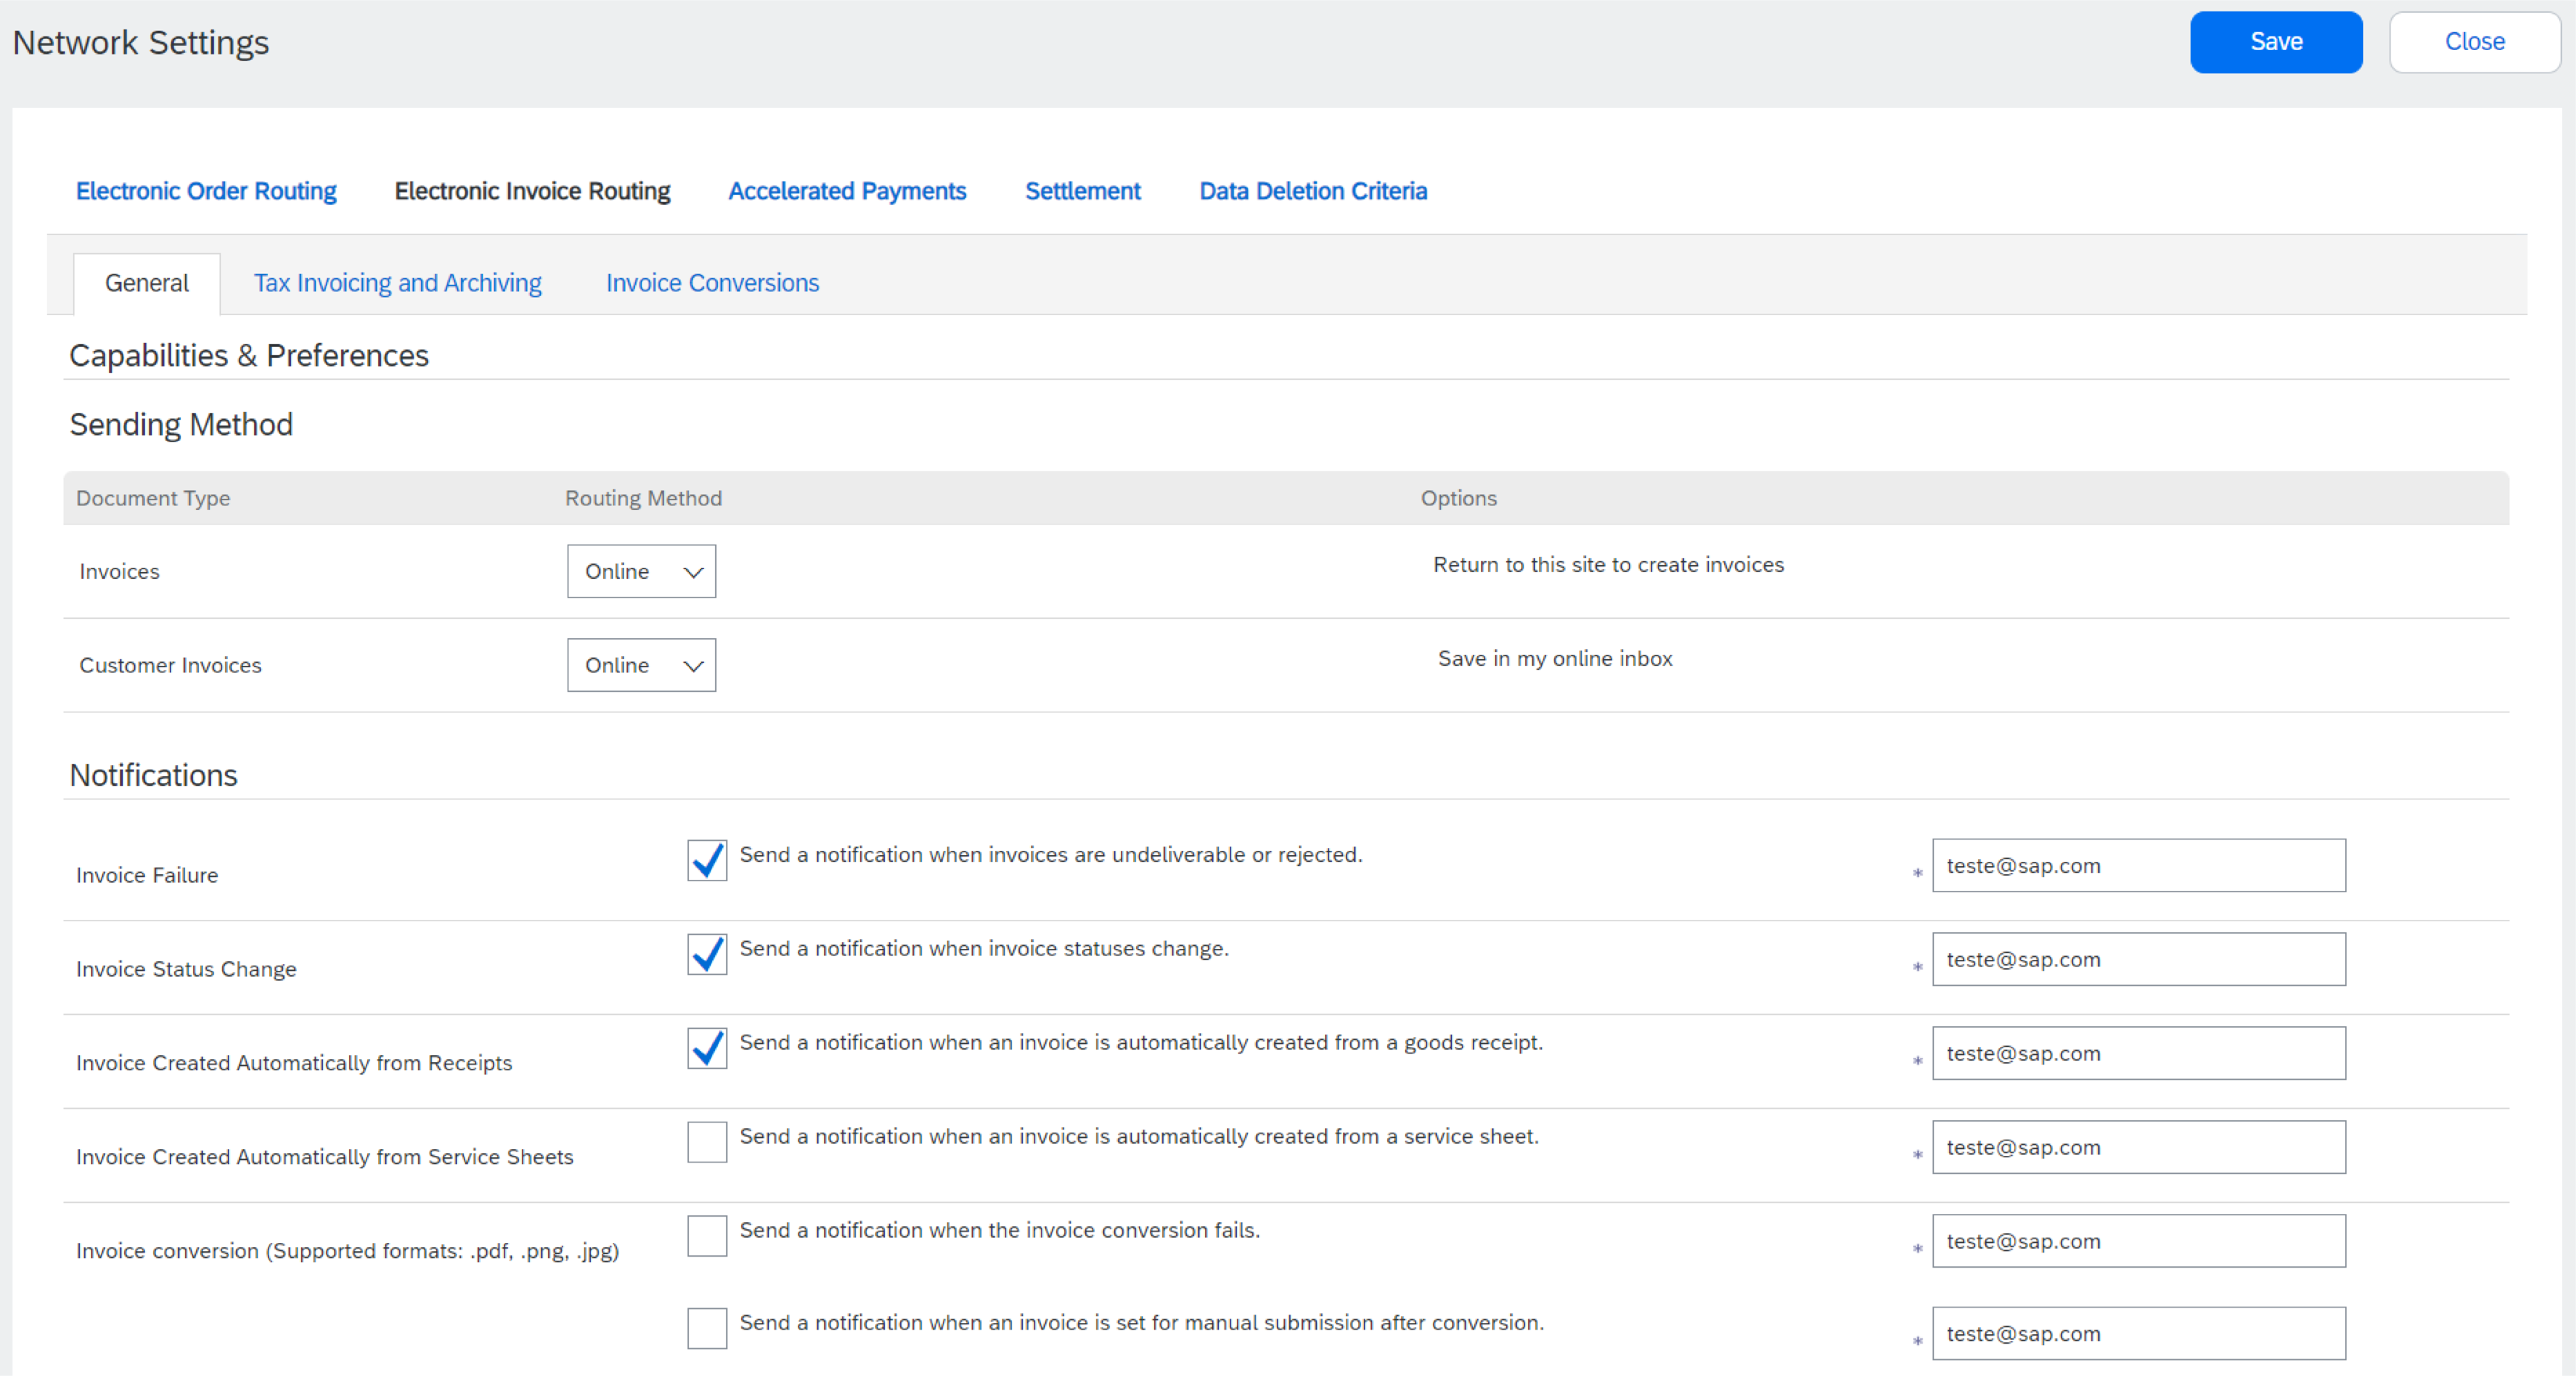
Configure Your Email Notifications

The Network Notifications section indicates which system notifications you want to receive and allows you to designate which email addresses you want to send them to.

  1. Click on Notifications under Account Settings.
  2. Switch to the Network tab.
  3. You can enter up to 3 email addresses per notification type. You must separate each address with a comma but no space between the emails. 

Complete Enablement Tasks

  1. From the home screen, select the Enablement Tab.
  2. Click on the Enablement Tasks are pending link.
  3. Select necessary pending tasks for completion.

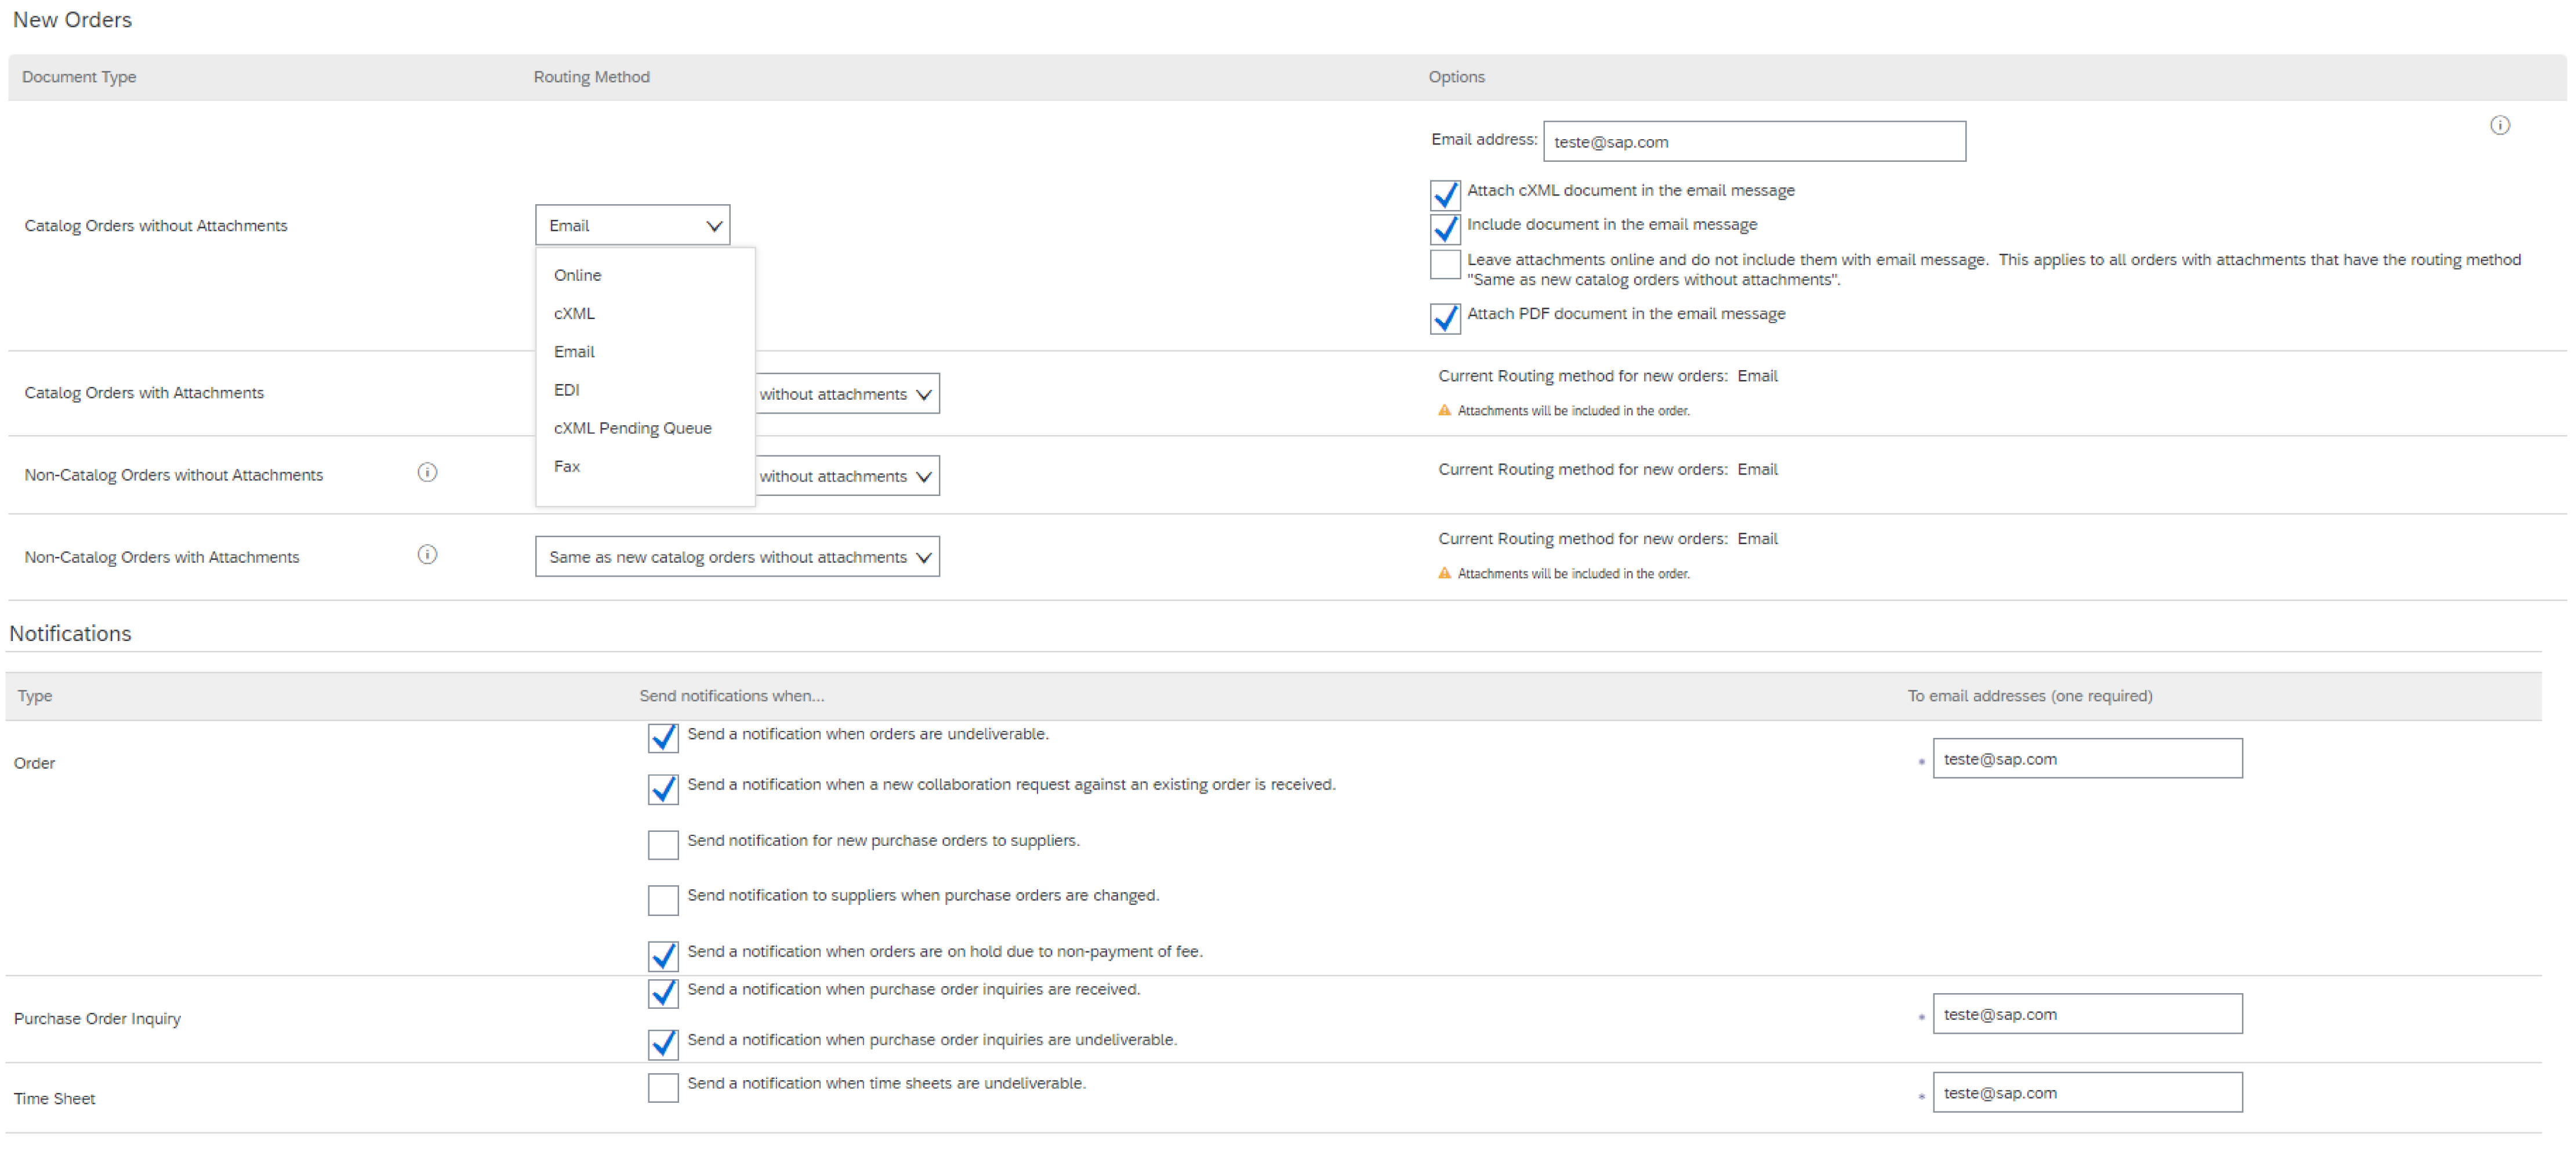
Note: Some pending tasks may be for your customer. They will not go away until your customer completes them.

Select Electronic Order Routing Method

  1. Click Electronic Order Routing from the main menu.
  2. Choose one of the following routing methods:
  • Online (Default): Orders are received within your AN account, but notifications are not sent out.
  • Email (Recommended): Email notifications are sent out, and can include a copy of the PO.

The other options are relevant if you choose to start an integration project between your system and SAP Business Network

  1. Select “Same as new catalog orders without attachments” for the other document types to automatically have the settings duplicated.
  2. Configure e-mail notifications.

    Note: You can enter 5 email addresses, separated by a comma and no space.

Electronic Invoice Routing

  1. Select Electronic Invoice Routing from the main menu.
  2. Keep the method Online (unless instructed otherwise by an SAP integration specialist).
  3. Configure the Notifications. We recommend you activate notifications related to updated and rejected invoices. 


Invoicing Tax Information

Your Tax/VAT information can appear automatically in your invoices if relevant to your company or region. 

  1. Select Electronic Invoice Routing from the main menu.
  2. Choose the tab Tax Invoicing & Archiving.
  3. Add the relevant references under the header Tax Information.


Invoice Archival

SAP Business Network can archive your invoices in zip format at the frequency of your choice. You can download your archived invoices from Outbox > Archived Invoices.

Long-Term Document Archiving

You can decide to enable the long-term archiving of your invoices. This is optional and free but is not available in all countries. Please refer to the Terms & Policies and the list of countries before enabling this option. 

  1. On the Electronic Invoice Routing page, choose the tab Tax Invoicing & Archiving.
  2. Click Configure Invoice Archival.
  3. Choose the archival frequency. If you have an online archival solution in place, you can have the archived invoices sent automatically to your secure URL. 


Configure Your Remittance Information

  1. From the Company Settings dropdown menu, select Remittances.
    Remittance Information / ID
  2. Click Create to create new company remittance information, or Edit, if you need to change existing information.
  3. Clients may ask you to assign IDs to your addresses so they can refer to the addresses uniquely. In such cases, fill in the provided ID in the field next to the customer name.
    Payment Methods
  4. If you are asked to add your payment method and/or banking information, make sure to tick the box Include Bank Account Information in invoices, choose your preferred payment method then complete all required fields under ACH or Wire Transfer.
  5. Click on OK when done

    Note: If you have more than one remittance address, select one as a default. If needed, assign Remittance IDs for this address for each of your customers. Each client can assign different IDs.


Set Up a Test Account

Setting up a test account is a requirement before starting a Catalog or Integration project. Your test account should be configured to match your production account. This will ensure the testing results are consistent with what will result in Production.

To set up your Test Account, log in to your SAP Business Network Production Account.

  1. Click the Account Settings in the top right corner and select Switch to Test ID. Note: The Switch To Test Account button is only available to the account Administrator or authorized users.
  2. Click OK when the SAP Business Network displays a warning indicating "You are about to switch to Test Mode". You will be transferred to your test account.

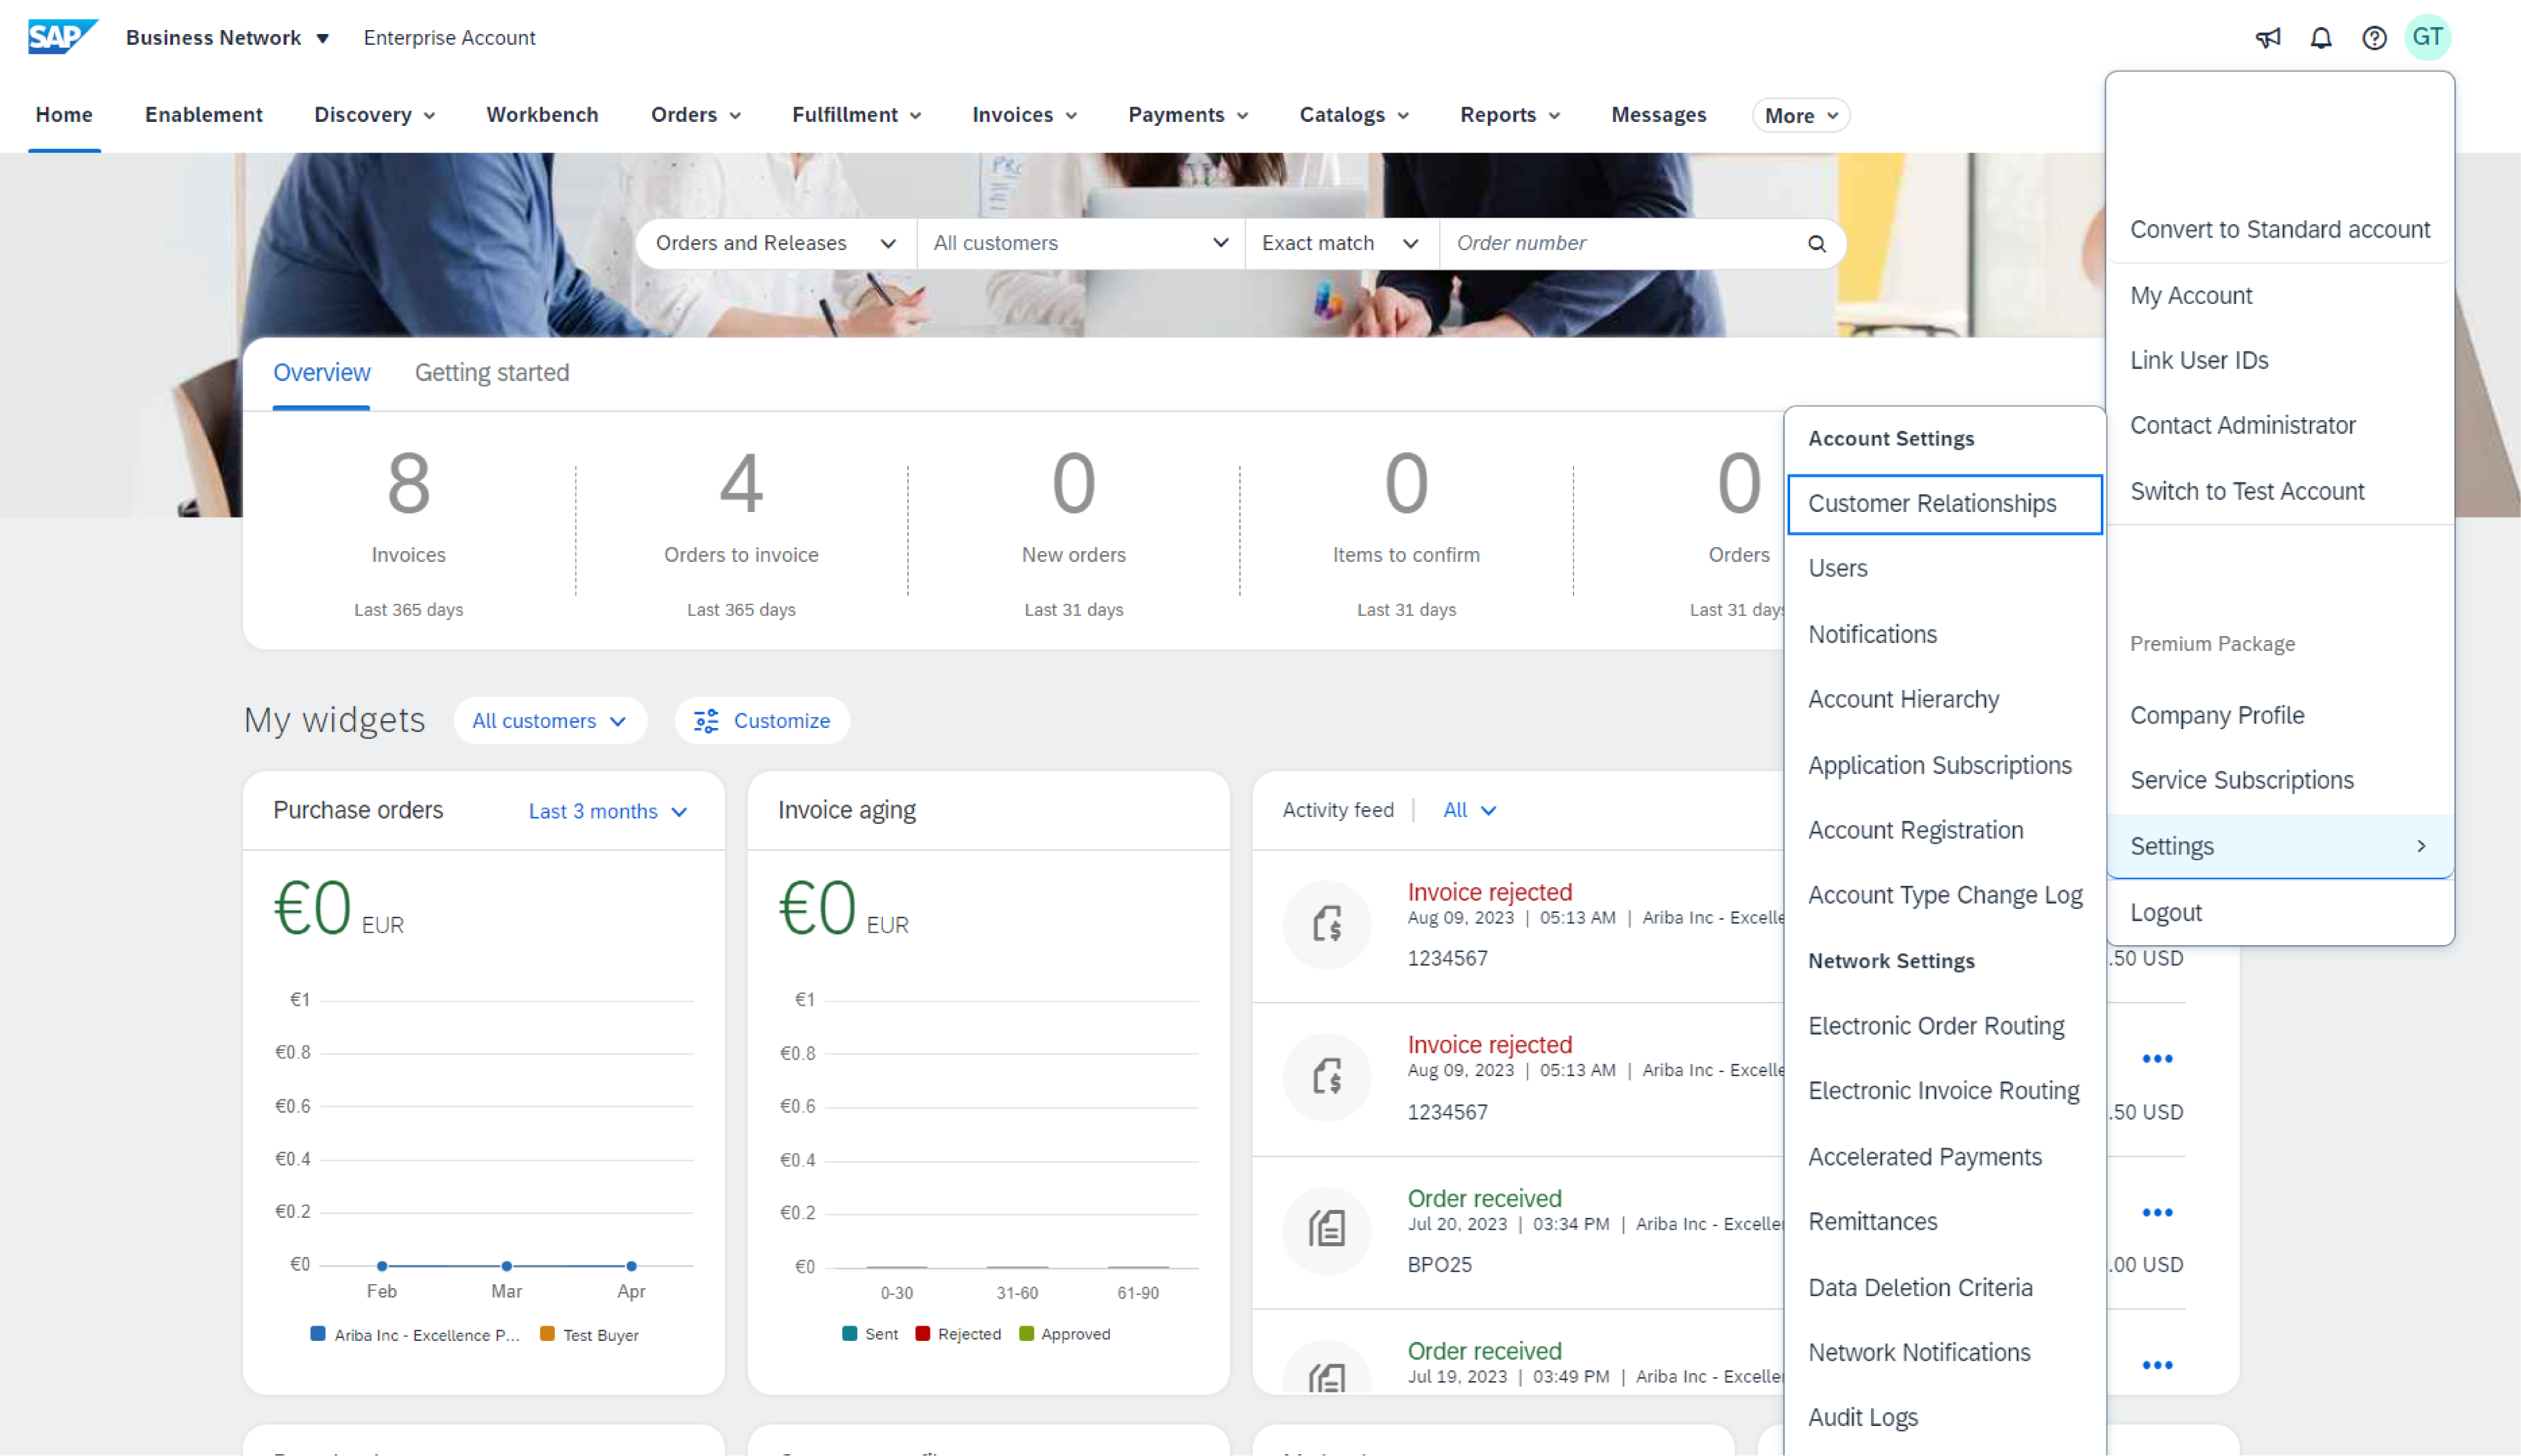
Note: the first time you enter your test account you need to create a Username and Password.

SAP Business Network always displays which mode you are logged into (Production or Test). Your test account ID has the suffix “-T” appended to your SAP Business Network ID (Former ANID).

Test account transactions are free of charge.


Additional Settings

The below items give you more options to further adapt your SAP Business Network account to the structure and needs of your company. 

Account Settings

Click on your initials in the top right corner, then on My Account to view or update your user settings.

These options enable you to access your personal user account information and settings.

Review Your Relationships - Current and Potential

  1. Click Customer Relationships from the Company Settings dropdown menu.
  2. Set up your preferences for new relationship requests (automatic acceptance or manual review). If set on Manual, pending requests will appear under Pending.
  3. Clicking on the name of a customer will display all rules and permissions enabled within the relationship.

Note: You can access the Supplier Information Portal of each customer by clicking on the hyperlink. This portal gives you documentation and instructions that are specific to each customer project.


Account Users and Administrator

  1. There can only be one administrator per account.
  2. Automatically linked to the username and login entered during registration.
  3. Responsible for account setup/configuration and management.
  4. Primary point of contact for users with questions or problems.
  5. Creates users and assigns roles/permissions.
  6. Up to 250 user accounts can exist per ANID.
  7. Can have different roles/permissions, which correspond to the user’s actual job responsibilities.
  8. Can access all or only specific customers assigned by the Administrator.


Create Roles and Users (Administrator Only)

  1. From the Company Settings menu, click on Users. The Users page will load.
  2. If you need to create a role, make sure to stay under the tab Manage Roles, then click on the "+" sign.
  3. Enter a name and a description for the role, then select one or several permissions for this role. Click on Save when you're done. 
  4. To create a user, go to the Manage Users tab and click on the "+" sign. Enter a username (email format), email address, first and last name, and optionally a phone number for this user. 
  5. Select a role in the Role Assignment section and decide if the user is to be assigned to all customers or specific ones
  6. Click on Done.


Edit and Modify Users (Administrator Only)

  1. Click on the Manage Users tab.
  2. Click on Actions for the selected user.
  3. Click on Edit to modify the role assignment or reset the password of the user.
  4. Other options:
  • Delete User
  • Make Administrator
  • Add to Contact List
  • Remove from the Contact List


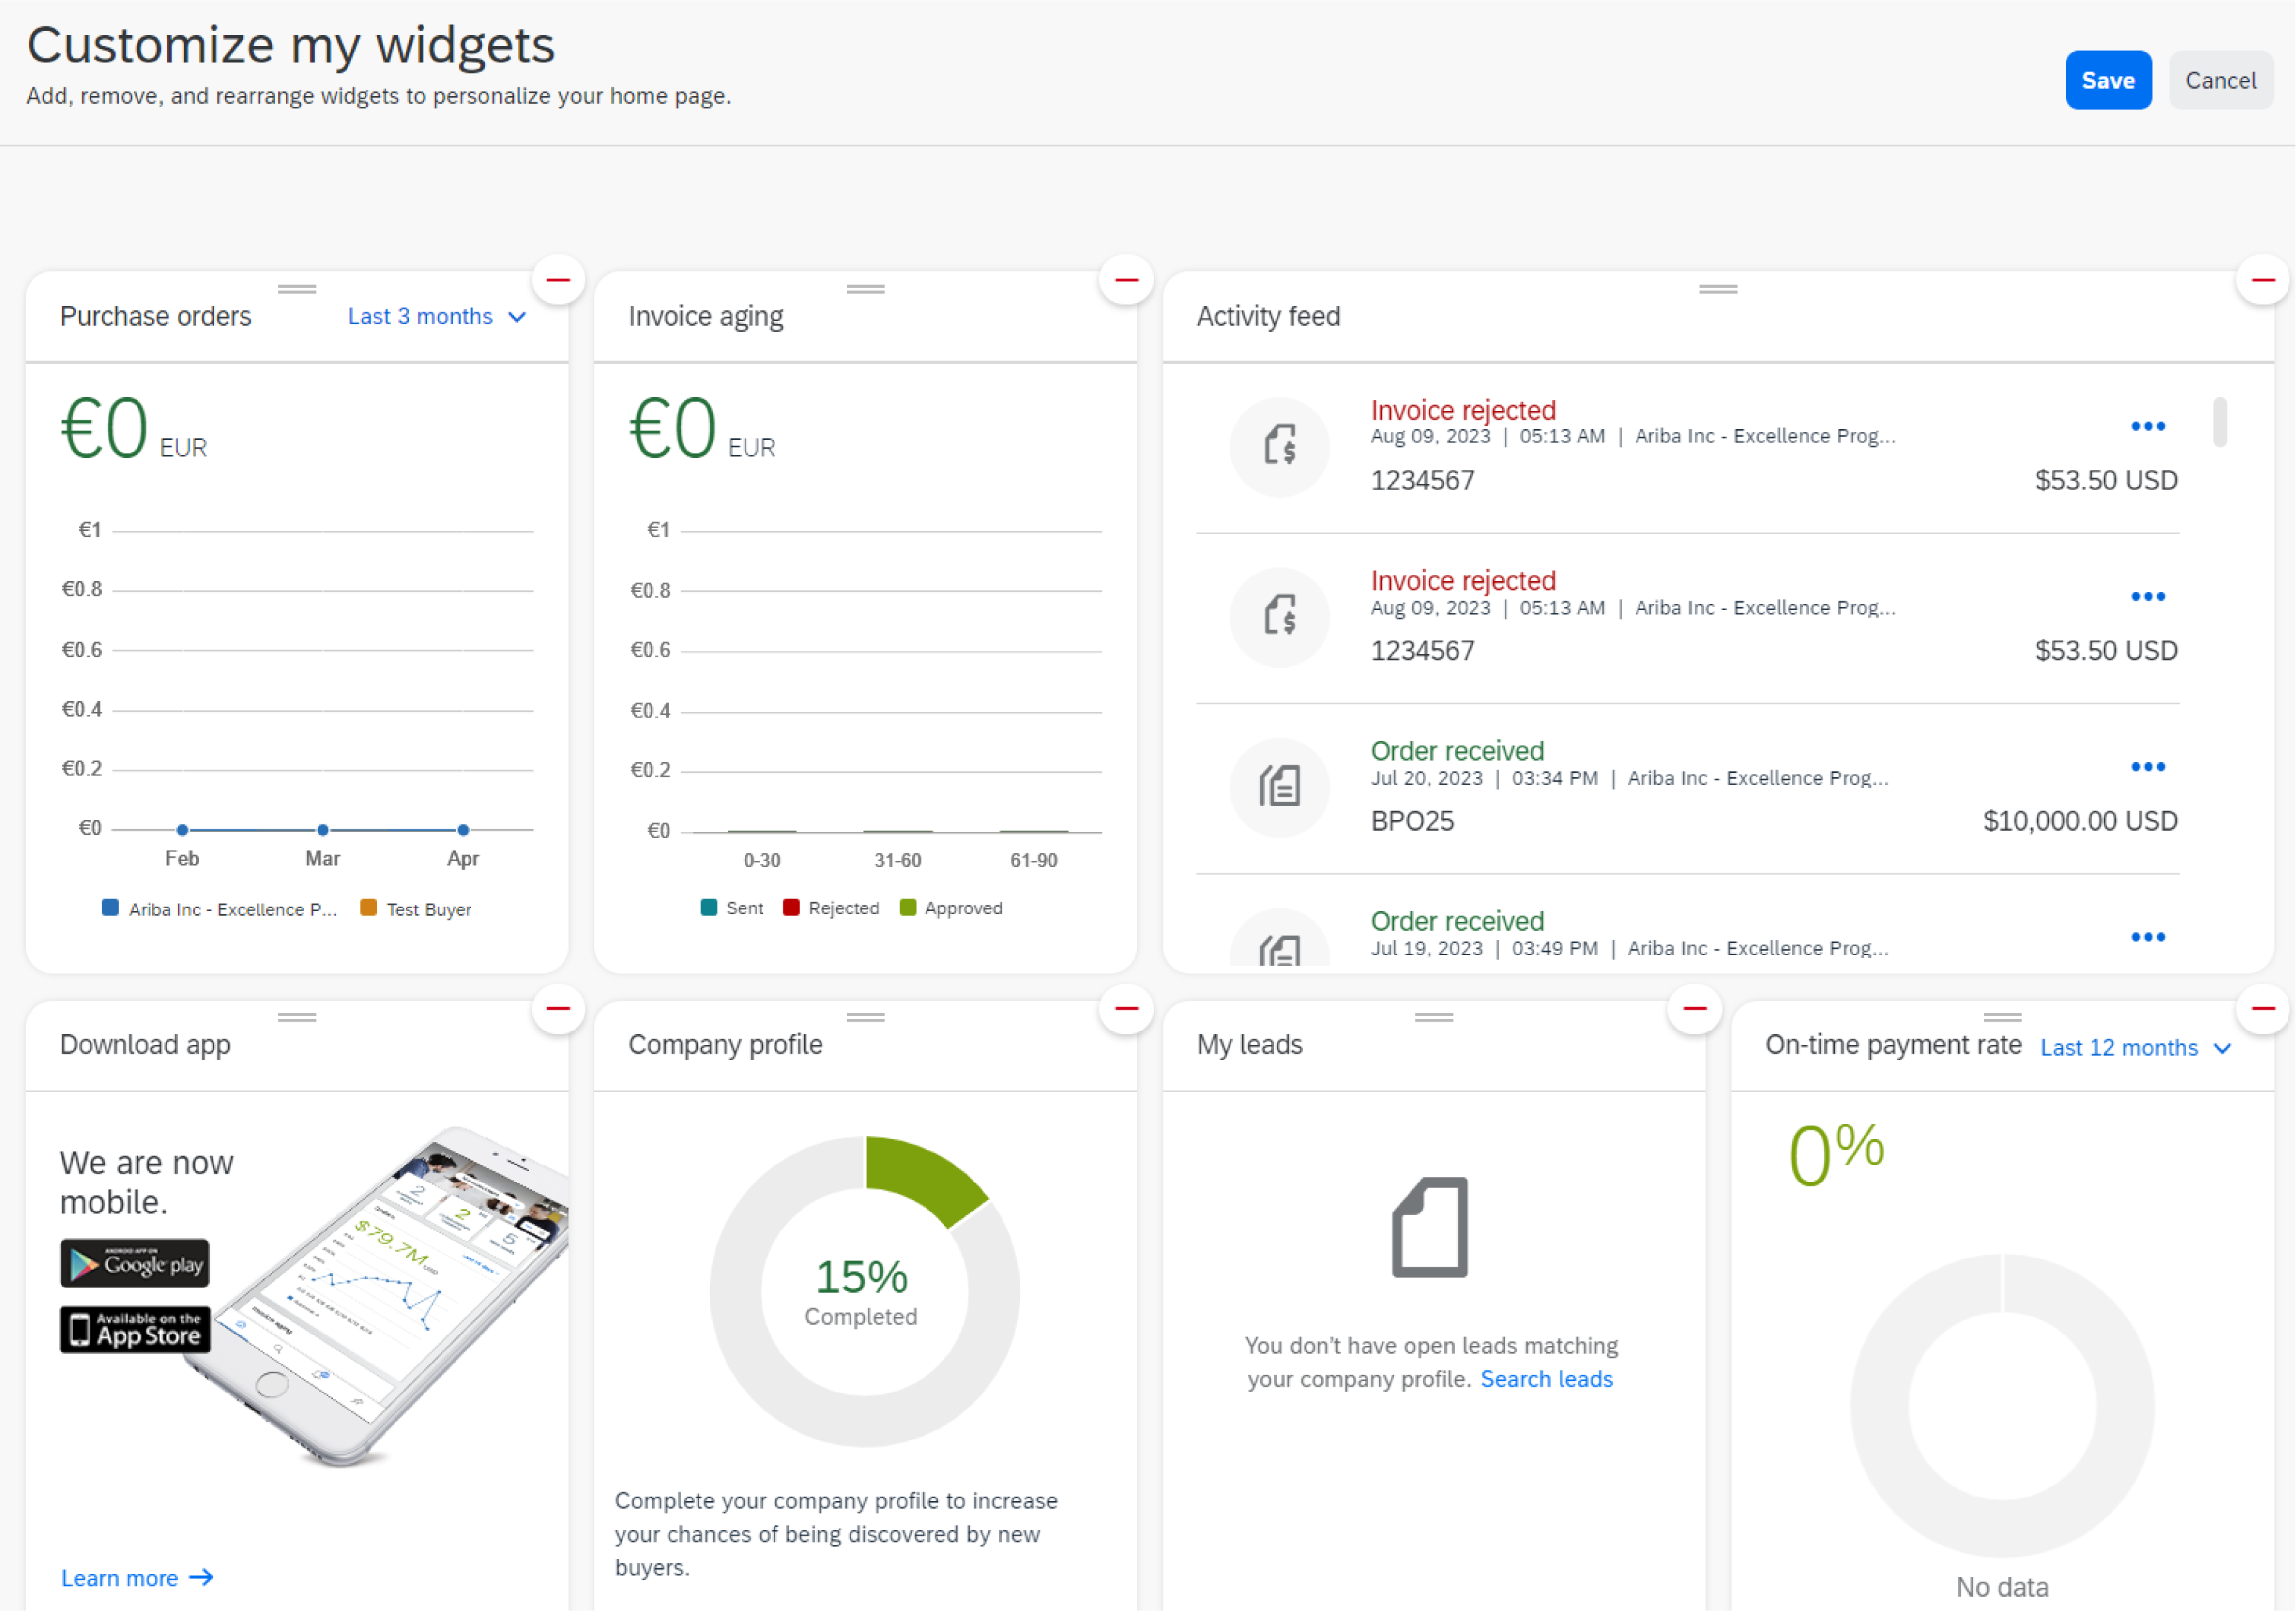
Widgets

Widgets on the main page serve various functions and can be customized to tailor the interface according to your organization's needs. Here's a guide on how to customize SAP SBN widgets and their functions:


Accessing Widget Customization:

Log in to your SAP SBN account with appropriate permissions.
Navigate to the main page or dashboard where the widgets are displayed.
Click on "Customize".

Choose the widgets you want to customize. These may include widgets for tasks, notifications, analytics, collaboration, or any other functionalities relevant to your business processes.

Widgets in SAP SBN serve various functions tailored to support business operations. Here are some common examples:

  1. Task Management: Widgets may display tasks assigned to you or your team, allowing you to track progress, prioritize, and mark tasks as completed.

  2. Notifications: Notifications widgets provide updates on relevant activities such as new messages, approvals, or alerts requiring attention.

  3. Analytics: Analytics widgets offer insights into key performance indicators (KPIs), financial metrics, or other data relevant to your business, allowing you to monitor performance and make informed decisions.


Managing Multiple Accounts

Managing multiple accounts can be made easier with two functionalities: Account Hierarchy and Link User IDs.

These are two independent features within the SAP Business Network supplier account that should not be confused. 


Account Hierarchy

Account Hierarchy is used to define a parent and one or multiple child accounts and create a hierarchy to help make them easier to manage. The linkage between individual accounts is for account management purposes.

The Account Hierarchy feature is only accessible to the Administrator and to users with specific permissions.

The Administrator of the parent account can link/unlink accounts and can sign on to the child account/s to take the following actions:

  • Change settings and complete the company profile
  • Publish catalogs
  • Check the status of payment for Ariba invoices and pay them
  • Upgrade to a higher Subscription package


The administrator cannot perform the following actions in the child account:

  • View connected buyers
  • Create documents (PO Confirmations, Invoices...)
  • Run reports


Create an Account Hierarchy

From the settings menu, go to Settings > Account Hierarchy. Then click Link Accounts.

If you are the administrator of the child account, enter the username and password. You are taken to a page informing you of what information will be shared between linked profiles.

You can decide to synchronize future company profile changes from the parent account to the child accounts by ticking the appropriate box.

Click Link Account to confirm.

If you are not the administrator of the child account, you can click on the Request link with other accounts to prompt a search filter allowing you to search for accounts and send a request to the relevant administrator.

Once a link is established, you can see a list of all linked child accounts. You can sign on to a child account by going to Actions > Sign On.

Once in the child account, you can return to the Parent account by clicking Back to parent account at the top of the page.


Link User IDs

Link User IDs is a default setting available to all users, without special permission needed.

Linking multiple user IDs allows users to:

  • log in to all their accounts using one username and password.
  • switch between their multiple accounts.

To link multiple user IDs, click on Link User IDs from the settings menu.

Two options are available: 

  • Approval needed: the user enters their username and clicks on the Send link request. The account administrator will receive an email notification inviting them to approve or decline the request. 
  • No approval is needed: enter the username and password of the account you want to link. The connection happens immediately. 

Once accounts are linked, the option Switch Account appears in the Settings menu.

Note: There is no option to unlink a linked user ID. Unless your account administrator deletes the username from the Manage Users section in the native account, it will not be removed from the Switch Account option.


Now that you've learned how to set up your profile and notifications, and have also explored some more advanced features of the platform like Account Hierarchy, if you wish to delve deeper into these topics or need detailed instructions on these processes, click on the links below to learn more:

Configure Routing Notifications (Orders and Invoices)

Account Hierarchy


Terms of Use  |  Copyright  |  Security Disclosure  |  Privacy