 |
| ||||||||
Issue
How to configure SAML Authentication for Ariba Buyer On-Premise?
Solution
SAML Authentication for Ariba Buyer On-Premise
This document gives examples of how the SAML Authentication may be implemented and is intended to illustrate the processes and concepts behind it. There are several SAML Identity Provider (‘IdP’ hereafter) solutions which are offered by third-party vendors. Responsibility for the implementation of any SAML IdP on the customer side rests with the customer.
1 SAML HTTP POST Binding Protocol Flow
1.1 Pre-requisites
In order for a customer to have access to Ariba, the following pre-requisites apply:
- The user must have an account created in Ariba Buyer where the Ariba UserID is identical to the user’s corporate account ID as specified in the SAML response Name ID.
- The user’s browser allows cookies and JavaScript.
- The customer provides Ariba with a valid public certificate, a corporate login relay page URL and a logout URL.
1.2 Initial Connection with Ariba
- A user accesses the Ariba Sourcing or Ariba Buyer URL. This may be the homepage or a deep URL that a user has bookmarked, or received in an email.
- Ariba looks up the applicable authentication method, which in this case will be SAML Corporate Authentication.
- Ariba creates a web session, sets the session ID cookie in the user’s browser and saves the location of the final destination URL in the session.
Instead of displaying an Ariba login page, the user’s browser is redirected to the customer protected resource page. The redirect URL will optionally include the Service Provider ID (SPID), this parameter can help the customer to identify the service provider and where it should post the SAML Response after the authentication if it hosts a generic SAML IdP URL.
1.3 User Authentication with customer’s corporate authentication
- The user’s browser is redirected to the resource page by Ariba redirect URL.
- The redirect URL also contains the SPID.
- Since this resource page is a protected resource, SAML corporate authentication service intercepts this request and prompts for username and password (or other credential methods) which are entered by the user and returned to corporate authentication service.
- SAML Corporate authentication service validates the credential against the central credential repository.
- On success:
- The SAML corporate authentication service sets a credential session cookie in the user’s browser
- The SAML corporate authentication service retrieves the Ariba Return URL based on SPID
- The SAML corporate authentication service prepares a signed SAML Response and redirects the browser to post the response to the Ariba Return URL.
- On failure:
- SAML Corporate authentication service displays an authentication failure page.
1.4 Final Authentication with Ariba
- The browser is redirected to the page as specified in the Ariba Return URL.
- Ariba web server maps the connection to the correct session based on the session ID in the browser cookie. Logic running on the Ariba application processes the SAML Response document and verifies the signature with the customer’s public certificate.
- On a positive match:
- The user-defined NameID is the same person that authenticated to the corporate authentication service earlier in this authentication process.
- Ariba then retrieves the destination page from the session and lands the user on the page. The user can continue using Ariba as an authenticated user, bound by the access privileges associated with the authenticated Name ID.
- Otherwise, an error is displayed.
- On logout, the Ariba application will logout from its applications and can land on the logout URL provided by the customer.
- The web session is configured to be expired after 30 minutes of idle time.
- The “User Authentication with Customer’s Corporate Authentication” step is the customer’s internal implementation and will be decided by their corporate security infrastructure.
2 Configuration Sample
This sample demonstrates the SAML authentication configuration with Microsoft Azure AD single sign-on.
The ‘Configuring Ariba Buyer Corporate Authentication’ step is a common configuration in Ariba Buyer. Other steps for different SAML IdP servers should refer to documentation from the respective third-party software vendors.
2.1 Sample Details
- Ariba Buyer SPID URL:
https://mycompany.com/Buyer/Main?realm=System&passwordadapter=PasswordAdapter1
- Ariba SAML Response Consumption URL:
https://mycompany.com/Buyer/Main/ad/samlAuth/SSOActions?awr=1&realm=System
2.2 Configuring Azure AD Single Sign-On
- In the Azure portal, choose to add a ‘Non-gallery application’ application.
In this sample, the application name is ‘Ariba_Buyer’. - After creation, from ‘Quick Start’, choose ‘Configure Single sign-on’ and ‘SAML-based Sign-on’
On the Single sign-on page, provide the following values:
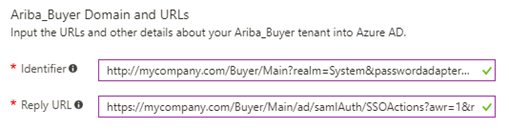
The Identifier should be the ‘Ariba Buyer SPID URL’.
The Reply URL should be the ‘Ariba SAML Response Consumption URL’.

Choose the User Identifier. This user identifier will be sent as the “Name Id” in the SAML Response, and be used as Ariba Buyer User Id.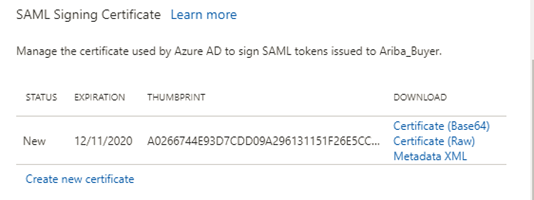
Download and keep a local copy of the ‘Certificate(Base64)’. This certificate will be installed to Ariba Buyer in a later step.
- Make the new certificate active and Save the change. This completes the Azure Single sign-on setup.
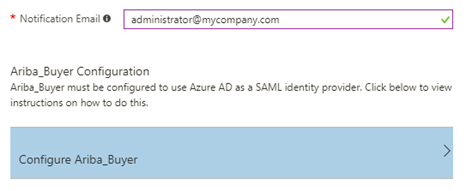
Then on the same page, click the ‘Configure Ariba_Buyer’ link. This is Azure’s instruction to configure the Service Provider. Copy the following URLs from this instruction.
2.3 Configuring Ariba Buyer Corporate Authentication
2.3.1 Enable Corporate Authentication
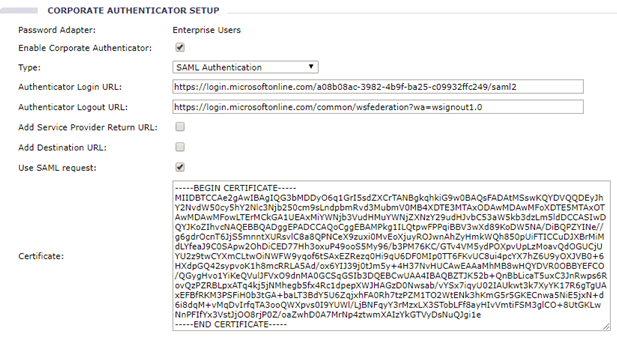
Find ‘Corporate Authentication’ from Core Administration > Site Profile.
The following figure is for informational purposes only. It demonstrates the input fields that Ariba uses to enable the service.
- Check ‘Enable Corporate Authenticator’ and choose ‘SAML Authentication’.
- It follows the SAML 1.1 protocol by default. Select Use SAML Request to enable SAML 2.0 protocol. It will post SAML Request to the login URL.
- Select ‘Add Service Provider Return URL’ to ask Ariba to generate a return URL in the URL parameter name “ret”. The customer can use this URL to post their SAML Response.
- Copy the content of the certificate downloaded from Azure AD.
- Save the change.
This step will take effect immediately.
But, before testing the SAML authentication with Azure AD, the next step still needs to be applied.
2.3.2 Add Ariba private key
Before proceeding to the following step, you should obtain an RSA key pair and import the RSA key pair to a Java Key Store (*.jks file).
The Ariba private key will be used to sign the SAML request.
- Copy the JKS file to location: <buyer_install>/Server/etc/certs folder.
- Add or modify the ‘System.Authentication.Keystores.AribaPrivateKeystore’ from the Parameters.table to contain the content shown in bold in the following code snippet.
|
Authentication = { Credentials = { MyCredentials = { Password = ""; Username = "";};}; Keystores = { AribaPrivateKeystore = { File = "etc/certs/<sample_key_store>.jks"; Keys = { Key1 = { Alias = <sample_alias>; KeyPassword = "<sample_key_pass>"; }; }; StorePassword = "<sample_store_pass>"; Type = jks; }; }; }; |
- Restart the Ariba Buyer Server to make the parameter change take effect.
Additional Information
After installing WebLogic 11gR1 on a new machine, ensure SAML Authentication works with the WebLogic 11gR1 Application Server. You must do the following manual changes to ensure that SAML authentication works:
To ensure SAML authentication works:
1 Stop the servers.
2 Go to the modules folder under the location where WebLogic 11gR1 is installed (/opt/bea10mp36/modules/).
3 Locate the file named com.bea.core.bea.opensaml2_1.0.0.0_6-2-0-0.jar.
4 Delete this jar file, or rename it to com.bea.core.bea.opensaml2_1.0.0.0_6-2-0-0.jar.old, to ensure that this jar file does not get loaded when starting the servers and instead loads the correct.SAML jar file present within /Server/Classes/ folder. This jar file is used by the system to pick up the correct XMLConfigurator class to load proper SAML data.
5 Restart the servers.
On-Premise > On-Premise - Ariba Buyer